TodoMVC
Overview
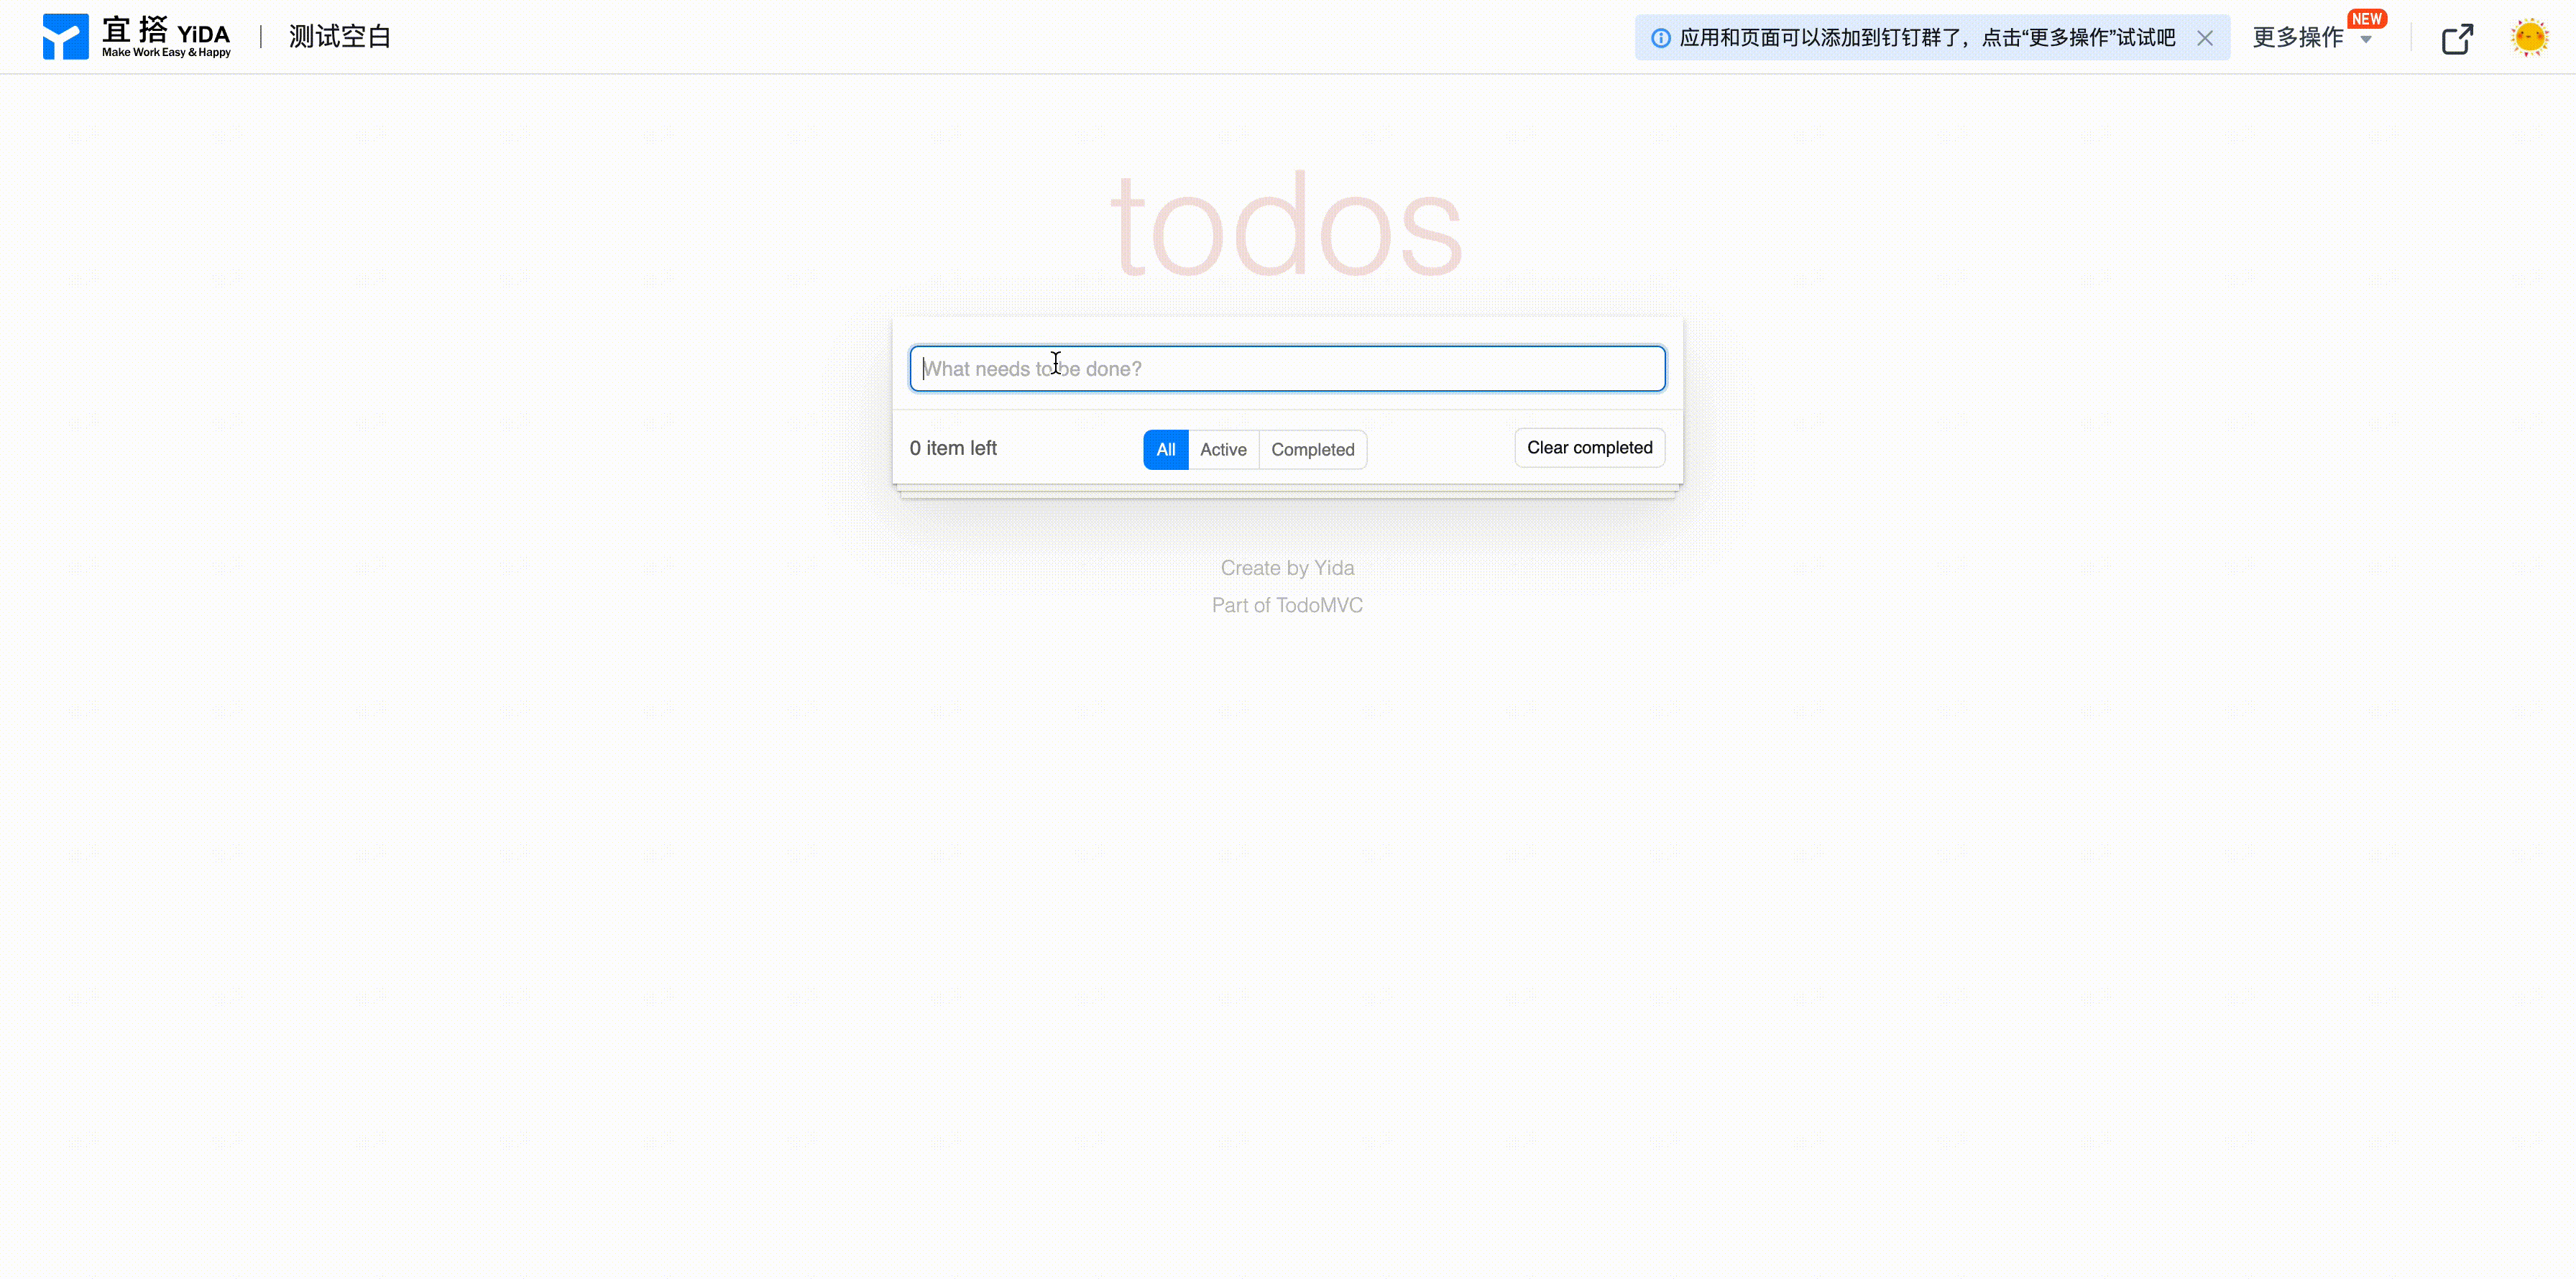
This tutorial belongs to Yida's advanced usage tutorial. We will refer to TodoMVC functionality and build a simple TodoMVC page from scratch. The final result is as follows (users can also visit the Example Page to view the effect or Enable this application to try):
Through this tutorial, you will master the following Yida skills:
- Basic Yida component usage;
- User behavior event handling;
- Global variable usage;
- Conditional rendering & loop rendering usage;
- Custom styling;
- Remote API usage;
- Yida OpenAPI usage;
This article does not detail the specific process of creating and deploying custom pages in Yida. If you are unfamiliar with the creation process, please refer to the Quick Start documentation. Let's implement the above effect step by step.
Basic UI - Giving TodoMVC Basic Framework
First, let's break down the structure of the official TodoMVC page, which roughly includes the following:

According to the TodoMVC UI display, we can find corresponding components in Yida that can be used (detailed usage of each component can be viewed in the Component Documentation), as follows:
- Big Logo- A static text, can use
Textcomponent; - Task input box- Used to enter new task content, can use
Inputcomponent; - Task status controller- Used to control the completion status of the corresponding task, can use
Radiocomponent; - Task content display- Used to display the specific content of the corresponding task, can use
Textcomponent; - Task operation item- Used to delete the corresponding task, can use
Buttoncomponent (the figure uses an Icon, for better semantic expression, we choose to use the button component); - Pending task count display- Used to display the total number of pending tasks, can use
Textcomponent; - Task status filter- Used to filter task lists with different statuses, can use
Radiocomponent; - Clear all completed status tasks- Used to clear all completed tasks, can use
Buttoncomponent; - Tool introduction- Introduces some basic information about Todos, static display, can use
Textcomponent;
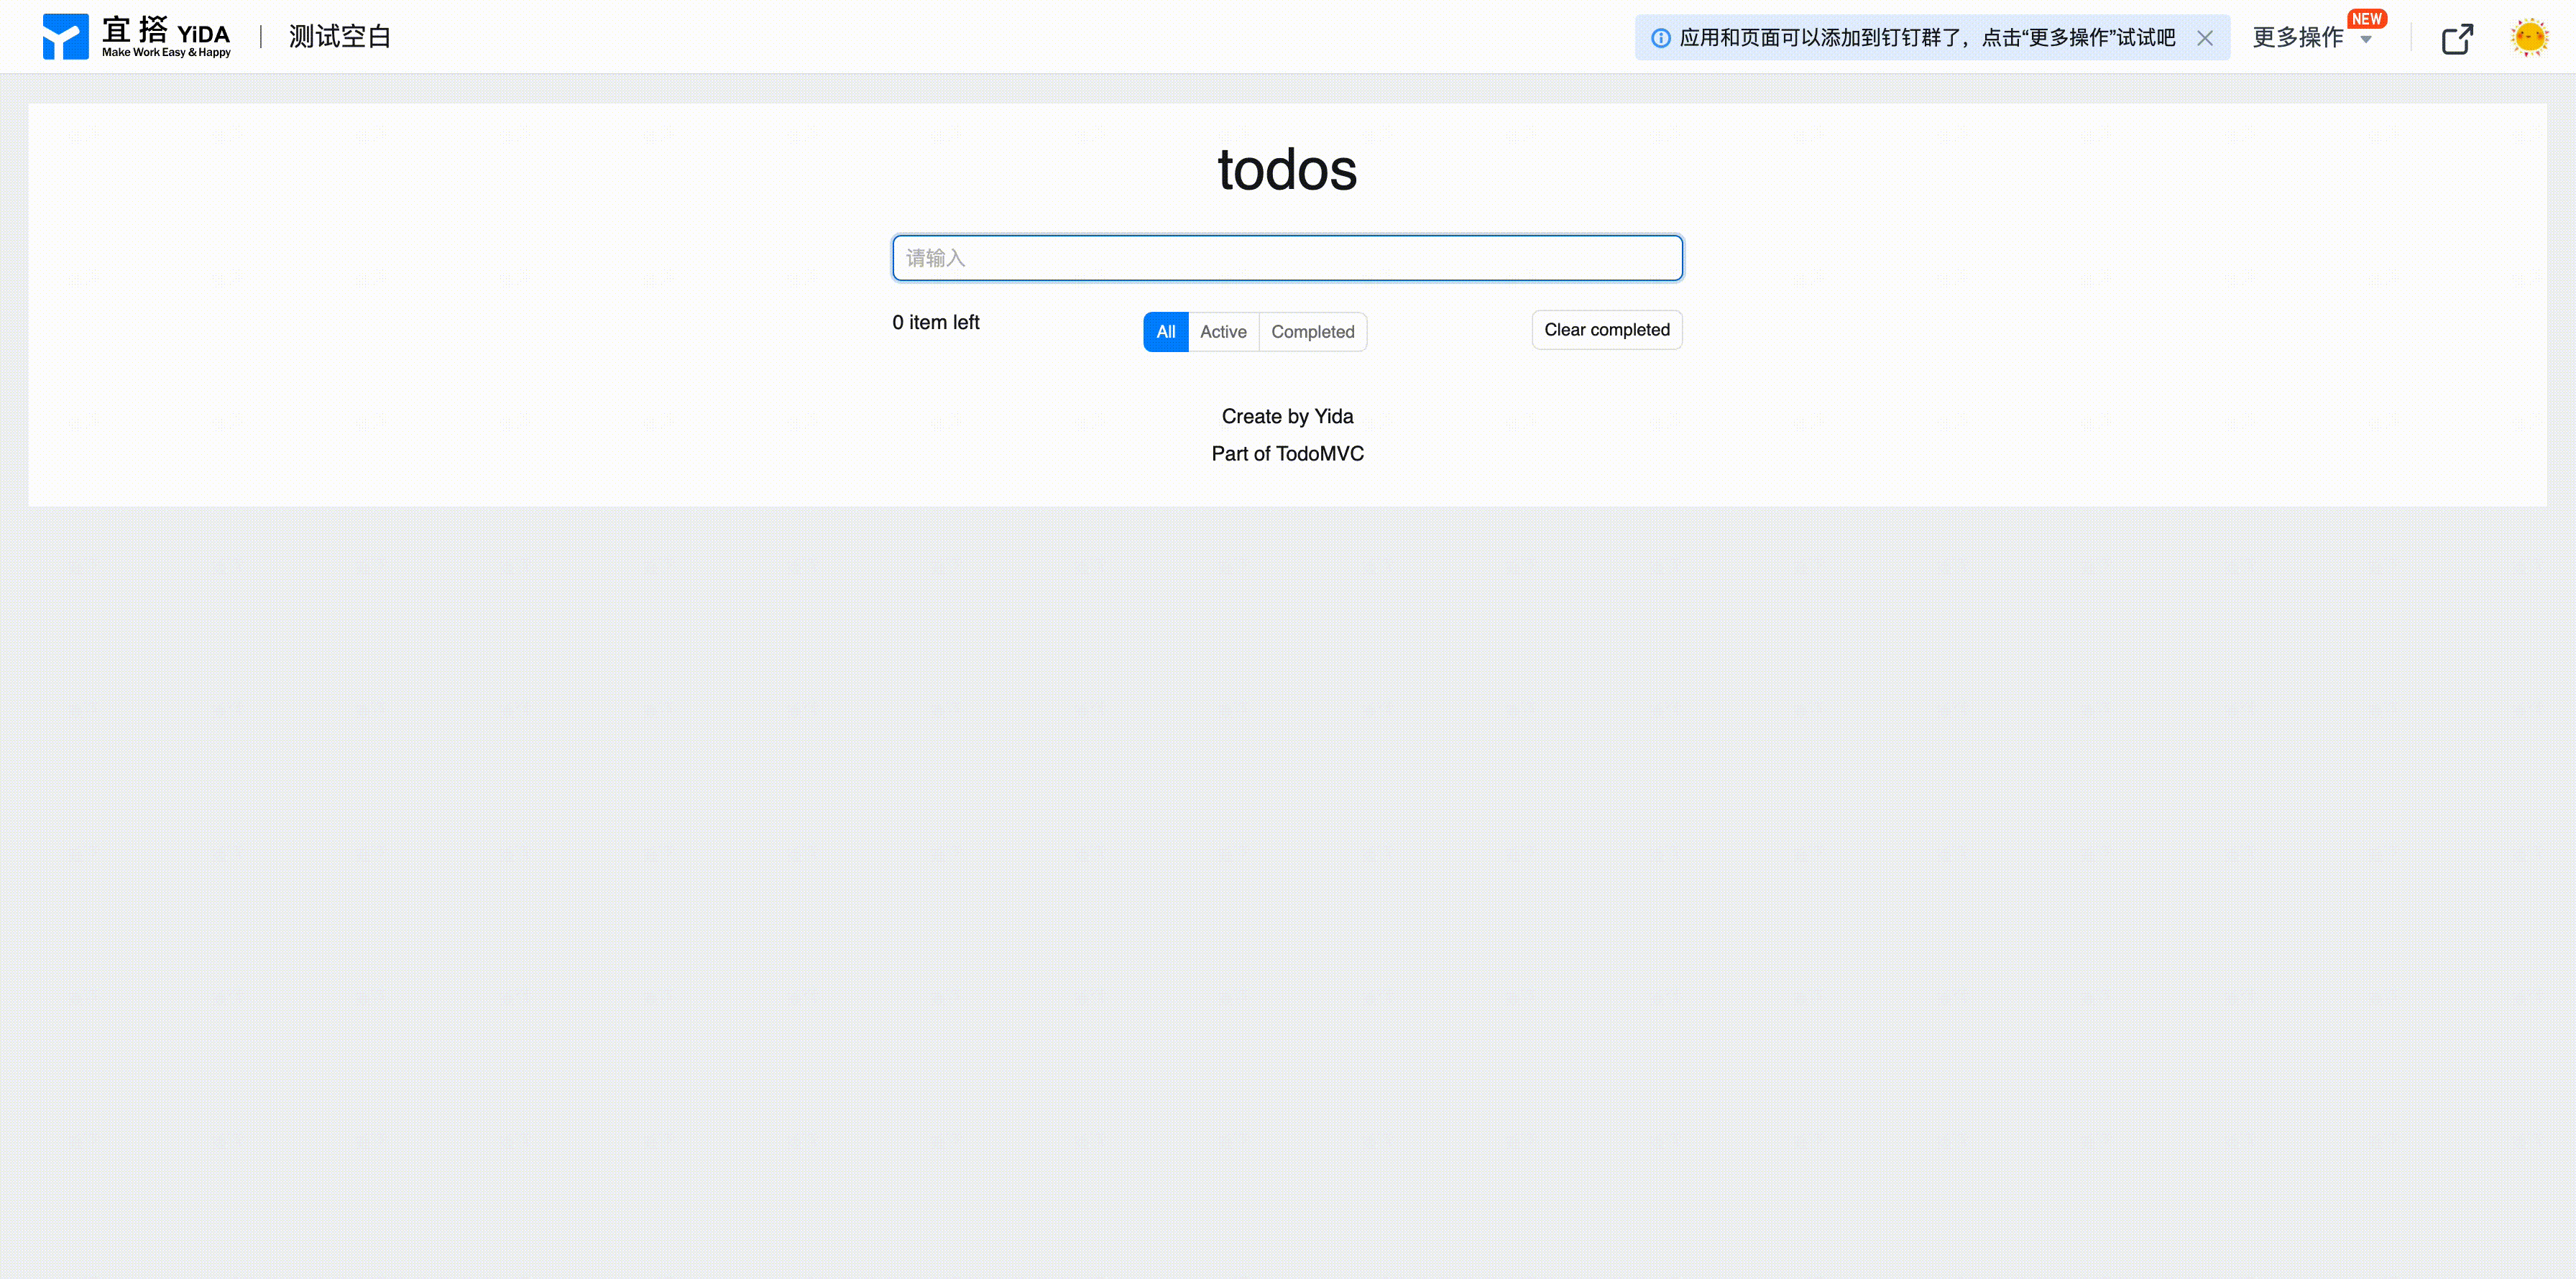
After determining the components needed for each part, we can start building a simple page through drag-and-drop and basic component property configuration. The effect is as follows. Developers can go to Demo Example to view the display effect, and view detailed configurations through Designer:

Logic Implementation - Giving TodoMVC an Interesting Soul
In the previous step, we completed the basic UI construction of TodoMVC, which is equivalent to completing a skeleton. Next, we need to give it a soul, which is the most important step. Before that, let's analyze what functions TodoMVC roughly has:
- Create pending tasks- Users enter task content in the task input box, click Enter key, and create a pending task in the task list;
- Update status- Users click the task controller to change the completion status of the current task (if completed, the task text will be struck through);
- Edit task content- Users click the task
Editbutton, bring up the task content input box, users can change content and click Enter key to submit (the official TodoMVC uses double-click to switch task edit status, since Yida does not yet support double-click events, we use the button method to switch edit status); - Delete pending tasks- Users click the
Deletebutton to delete the specified pending task; - Count uncompleted numbers- Display the statistical number of uncompleted pending tasks in the lower left corner of the page;
- Filter by status- Users switch the filter at the bottom of the page to display different task lists:
- All - Display all task lists;
- Active - Display pending task lists;
- Completed - Display completed task lists;
- Clear completed status pending tasks- Users click the
Clear completedbutton in the lower right corner of the page to batch delete all completed tasks;
Basic functions have been sorted out. Now let's implement the basic functions of TodoMVC step by step. The final effect is detailed in Demo Example, and specific implementation can be viewed through Designer. The display effect is as follows:
Step 1: Create Page Global Variables
Yida's design philosophy is similar to React, both are MVVM mode. Therefore, before functional development, we need to first define data models needed in the page, i.e., global state (specific usage see Page State Document). We define the following global variables:
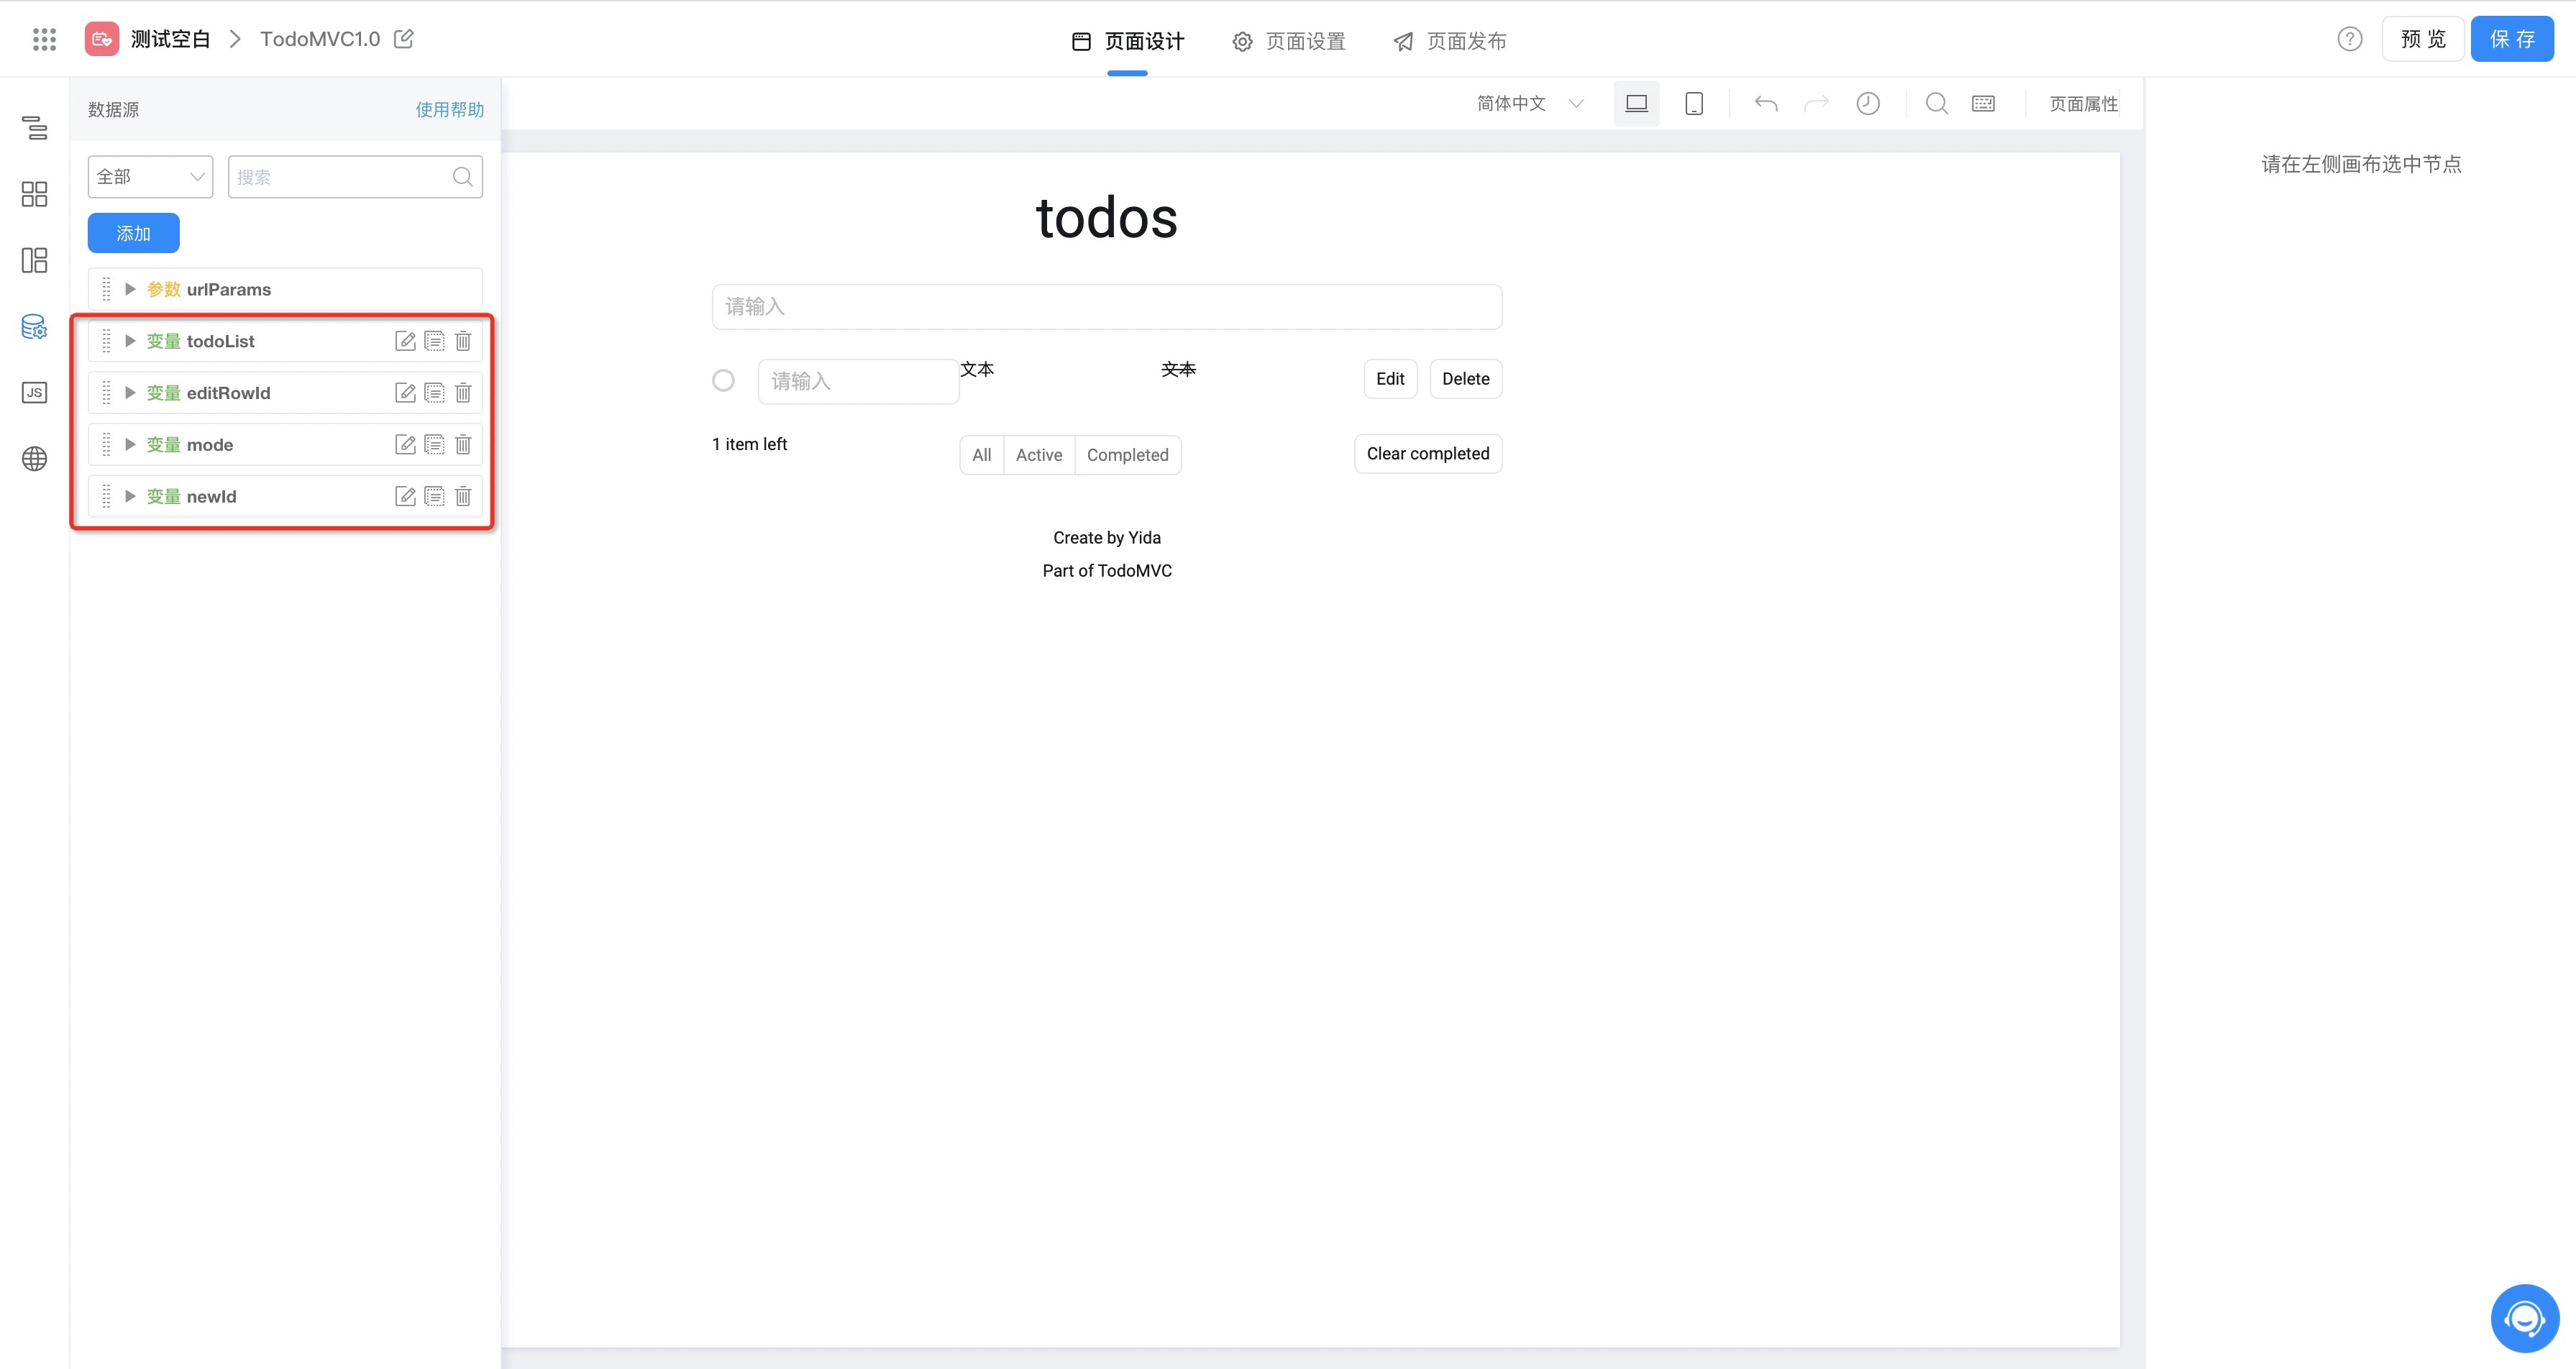
- todoList (array type) - Used to record all pending task information in the list, structure as follows:
{
  todoList: [
    {
      id: 1, // Pending task unique ID
      content: 'XXXX', // Pending task content
      done: false, // Pending task completion status
    },
  ];
}
- editRowId (number type)- Used to mark the task ID currently in edit status (when in edit status, the task content area will become an input box for users to modify content), default can be left empty;
- mode (string type)- Current filter status value of task list, optional values: All, Active and Completed, default is:
"All"; P.S.: Need quotes. - newId (number type)- A new ID generation identifier. Whenever a new task is created, this
newIdwill be used as the new task ID, andnewIdwill also automatically increment by 1 to ensure uniqueness of all task IDs;
Step 2: Implement Create Pending Task Function
Now we can start implementing the first function. In this step, we want users to input task content in the input box and create a pending task by clicking Enter key (for event binding usage see Event Handling Document).
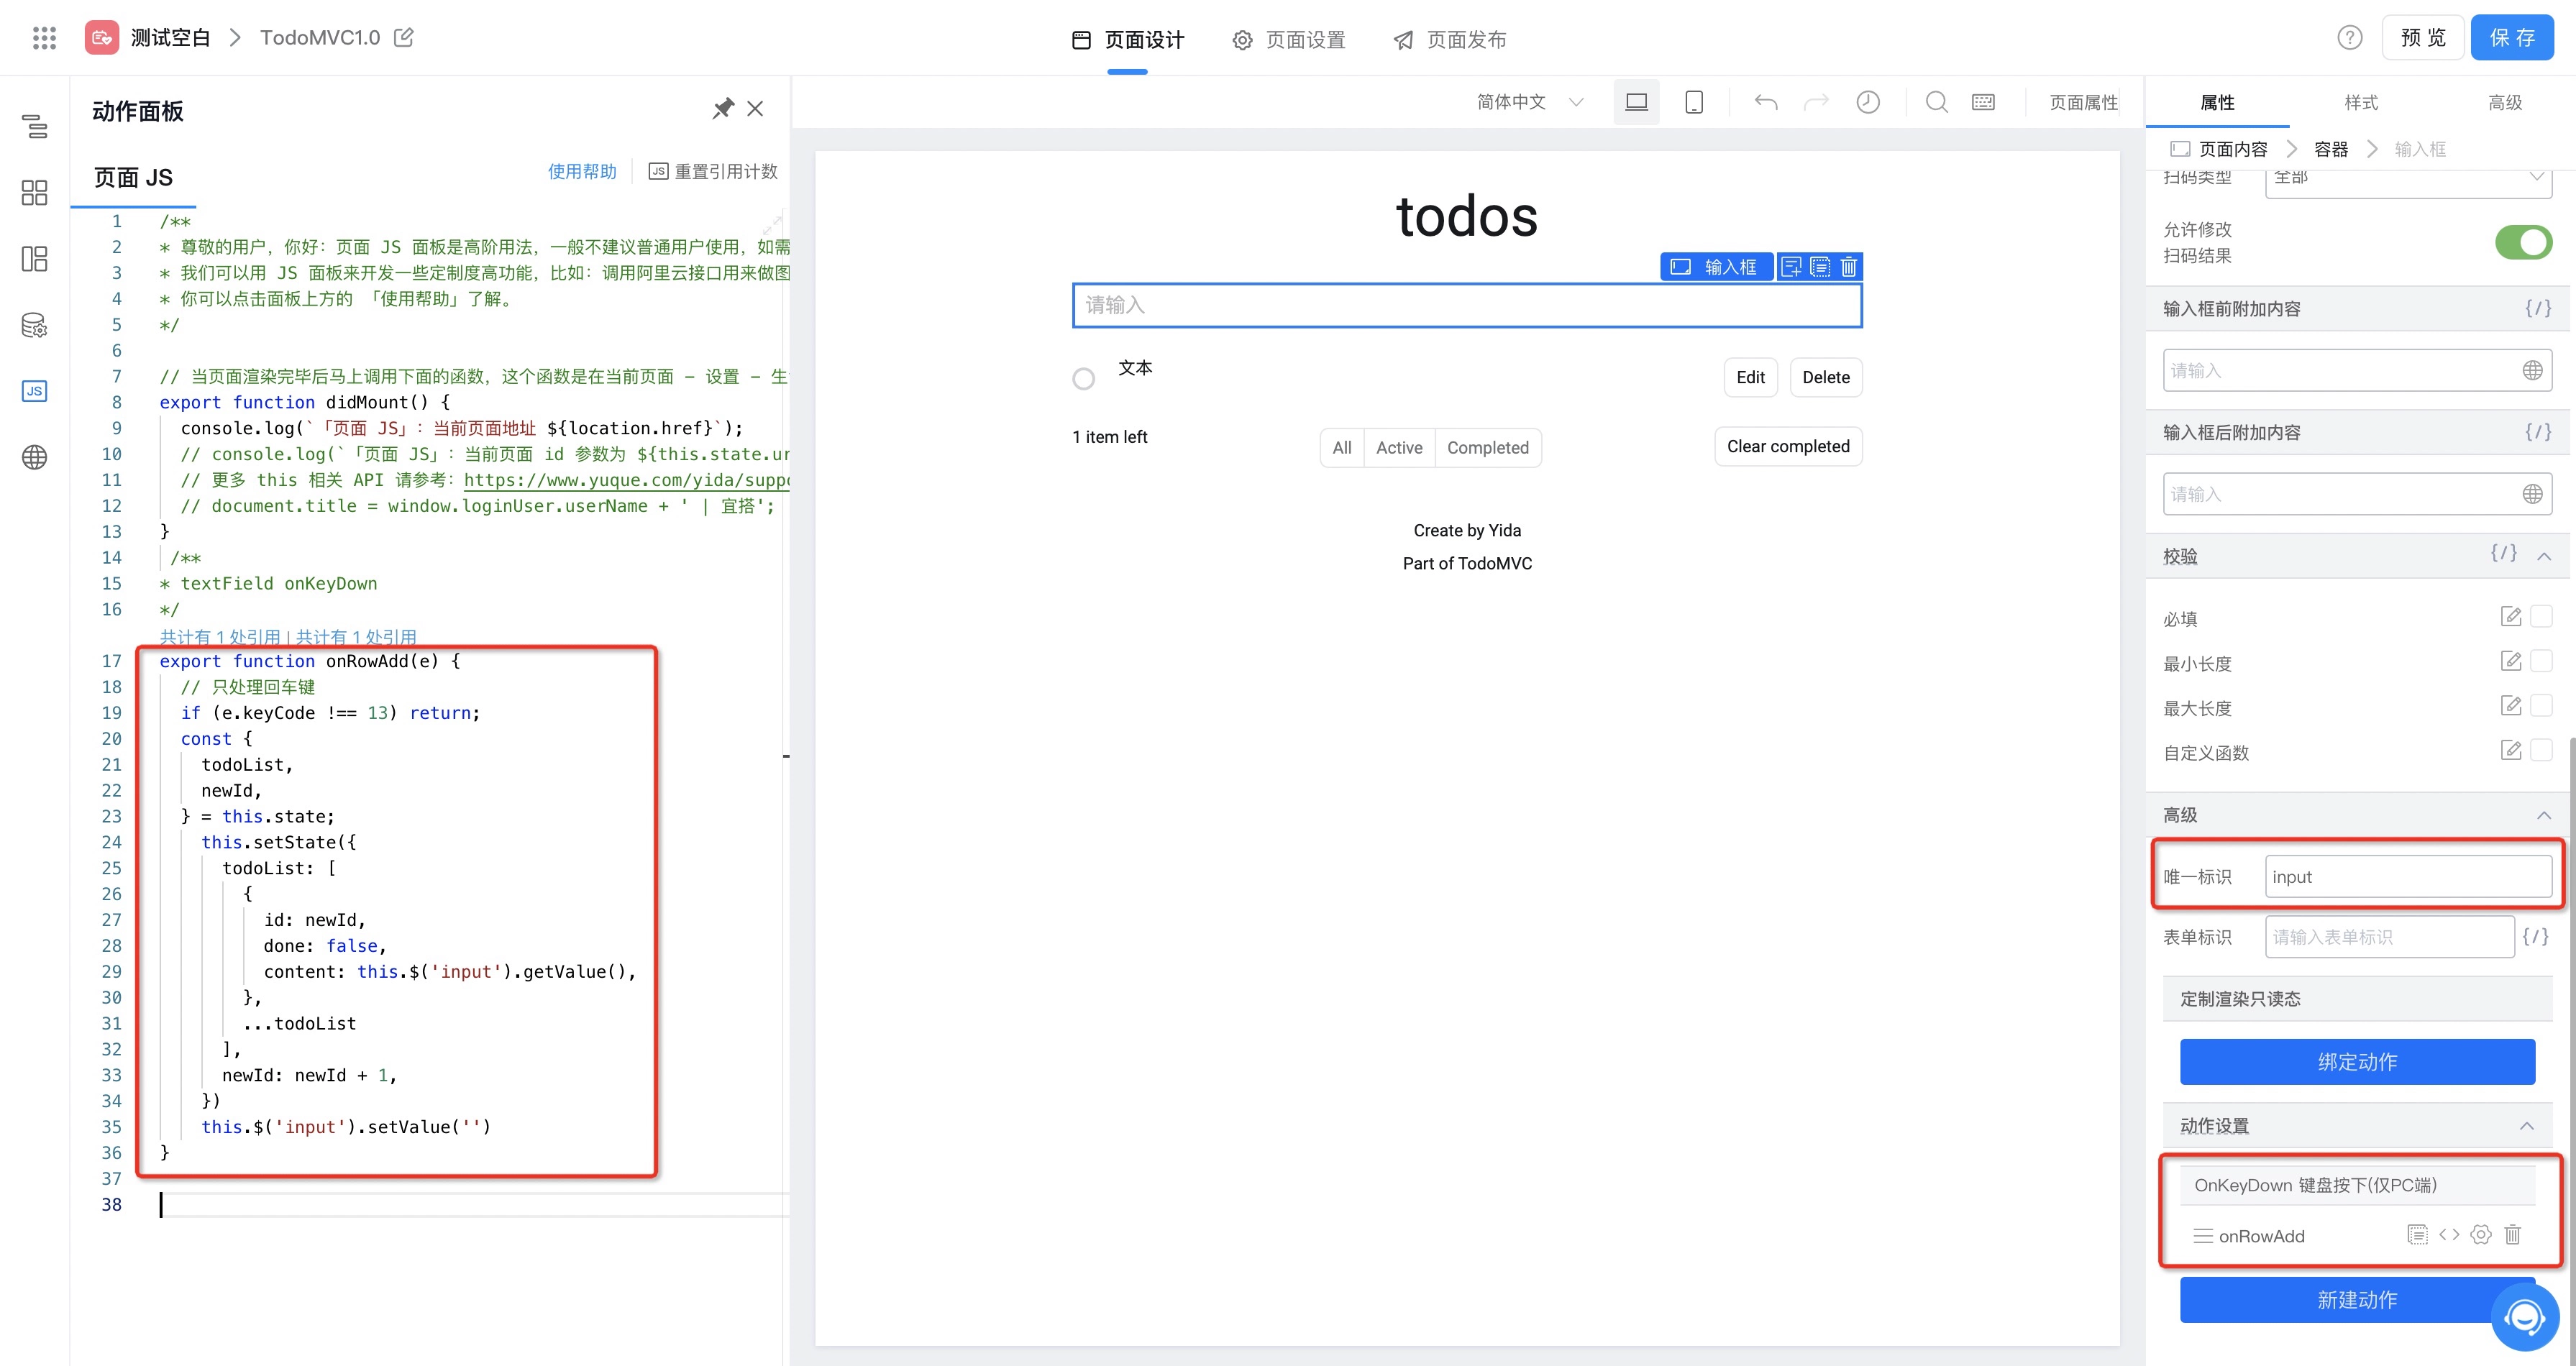 As shown above, we mainly do 3 things in this step:
- Add a unique identifier ("input") to the input box, to facilitate getting the input content of the input box;
- Bind a onKeyDown event ("onRowAdd") to the input box, which triggers when users press keys;
- Implement the
onRowAddmethod, judging if users press Enter key, then insert a new pending task data at the top of todoList;
Specific implementation code is as follows:
export function onRowAdd(e) {
  // Only handle Enter key, return directly if not Enter key
  if (e.keyCode !== 13) return;
  const { todoList, newId } = this.state; // Get current task list data and newId identifier from global variables
  this.setState({
    todoList: [
      {
        id: newId,
        done: false,
        content: this.$('input').getValue(), // Get input box user input content
      },
      ...todoList,
    ], // Update todoList data, add a record, id is newId, status is pending, content is user input content from input box
    newId: newId + 1, // Update newId for next task creation
  });
  this.$('input').setValue(''); // Clear user input content in input box
}
Step 3: Implement Task List Loop Display
Through the previous step, we can already generate pending tasks from user input content and add to global variable todoList. Next, we need to display the pending list below the input box. This step will use Loop Rendering related knowledge.
- First select the container component outside the pending task information, then bind state.todoList to the container's Loop Data through variable binding in advanced properties;


-
Secondly we need to bind the completion status and content of tasks to the corresponding data fields of loop data. In loop rendering, developers can get current row data through
item, as follows:-
Set the default value property of radio component to bind task status;
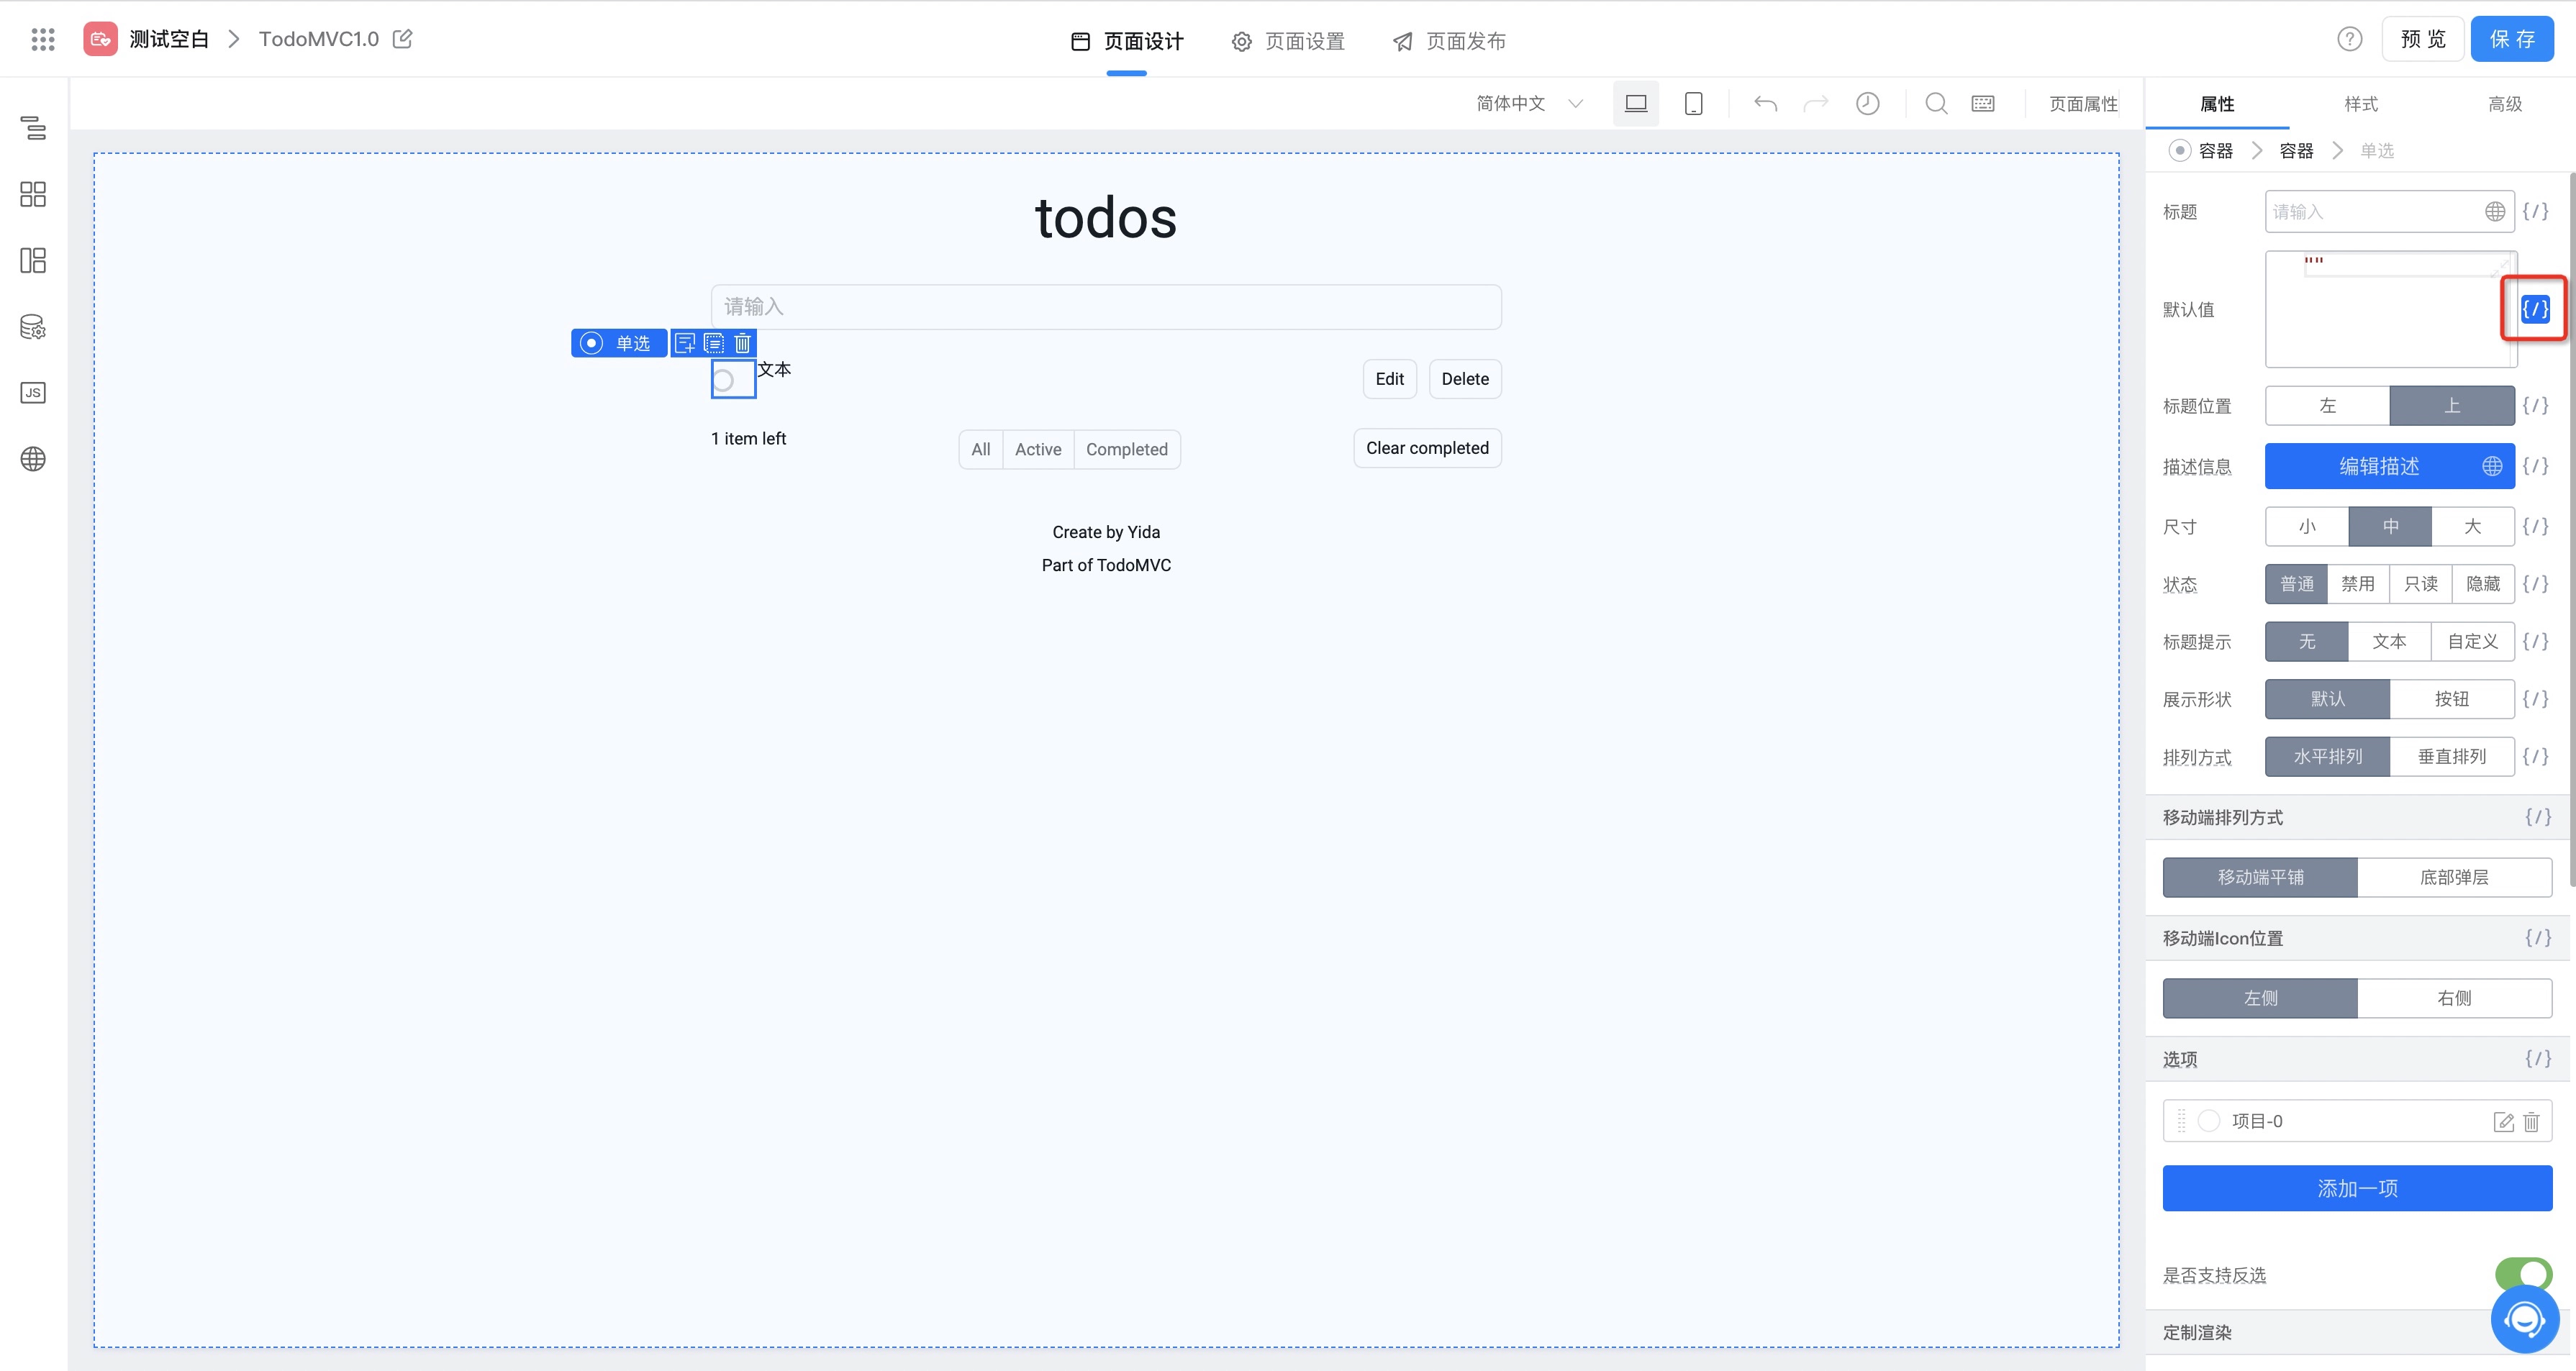
-
Set the content property of text component to bind task content;


-
After completing this step, we can get the following effect through preview:

Step 4: Implement Task Update & Delete
Through the previous step, we basically implemented the add and display functions of todoList. Next, we need to implement task update and delete functions.
Implement Multi-state Display of Task Content
Through analyzing TodoMVC functions, we found that task content in the task list has 3 different display forms:

We decided to use 3 components (2 text components + 1 input box component) to implement different display effects and use Conditional Rendering to bind whether to render property to implement display switching:

The following are the whether to render variable binding values for three components:
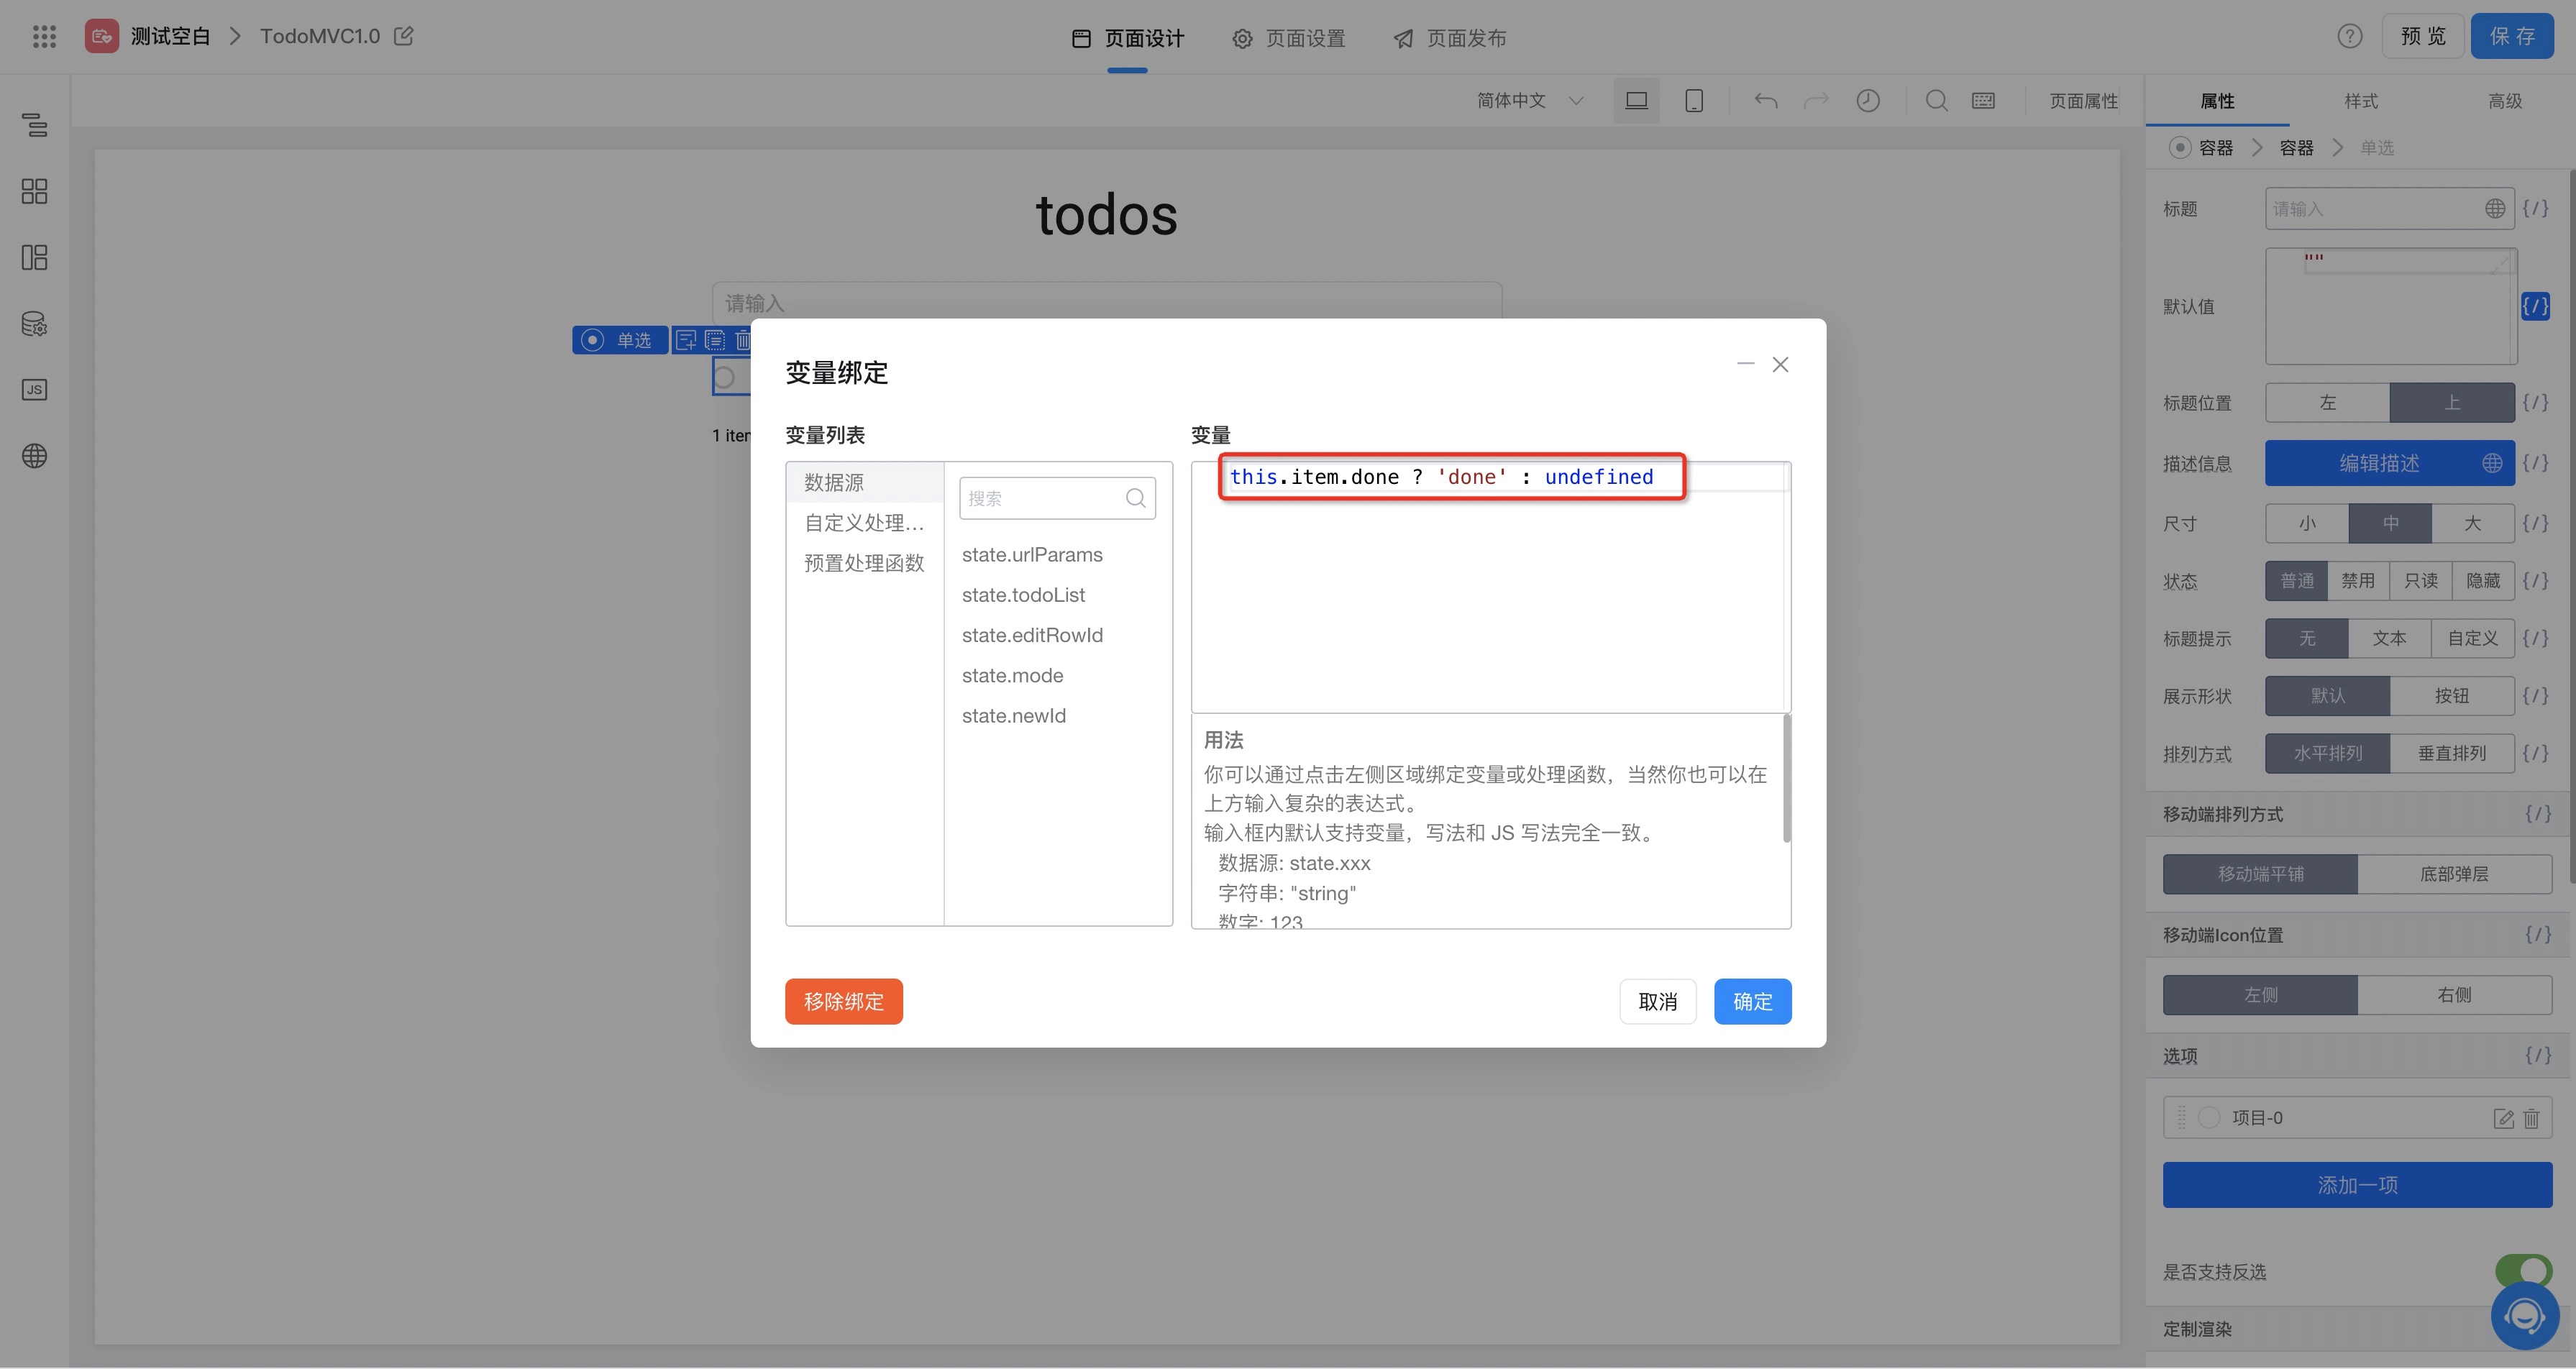
- Edit status- Display when global variable editRowId matches current row ID:
state.editRowId === this.item.id - Pending status- Display when current task is not in edit status and its status is pending:
state.editRowId !== this.item.id && !this.item.done - Completed status- Display when current task is not in edit status and its status is completed:
state.editRowId !== this.item.id && this.item.done
Implement Task Content Editing
In this step, we want to achieve the effect that users click the Edit button in the task operation bar, and the task switches to edit status. At the same time, users can perform secondary editing based on existing content and click Enter to submit edit content, and the task returns to the previous display status.
To implement this function, we need to proceed in two steps:
- Bind onClick event ("onEdit") to Edit button. When users click the
Editbutton, we set the current task's id as the global variable RowEditId and trigger re-rendering to switch the task status to edit status, as follows:
onEdit code is as follows:
export function onEdit() {
  this.setState({
    editRowId: this.item.id,
  });
}
- Set a unique identifier ("rowInput") for the input box component in task edit status, and referring to the implementation logic of creating tasks, bind onKeyDown event ("onRowEdit") to update the content of the current task in todoList, as follows:

onRowEdit code is as follows:
export function onRowEdit(e) {
  // Only handle Enter key, return directly if not Enter key
  if (e.keyCode !== 13) return;
  this.setState({
    todoList: this.state.todoList.map((item) => {
      if (item.id === this.item.id) {
        // Find the currently edited task from todoList and update its content
        return {
          ...item,
          content: this.$('rowInput').getValue(),
        };
      }
      return item;
    }),
    editRowId: 0, // Reset editRowId to make the current task return to previous display status
  });
}
PS: Since task content editing is based on existing content, we need to set the default value of the input box to item.content through variables.
Implement Task Completion Status Switching
When users click the radio button at the front of the task, they need to be able to switch the task's completion status. Therefore we need to listen to the onChange event ("onTodoCheck") of the radio component, and when the radio button status changes, update the task status in todoList in real time:
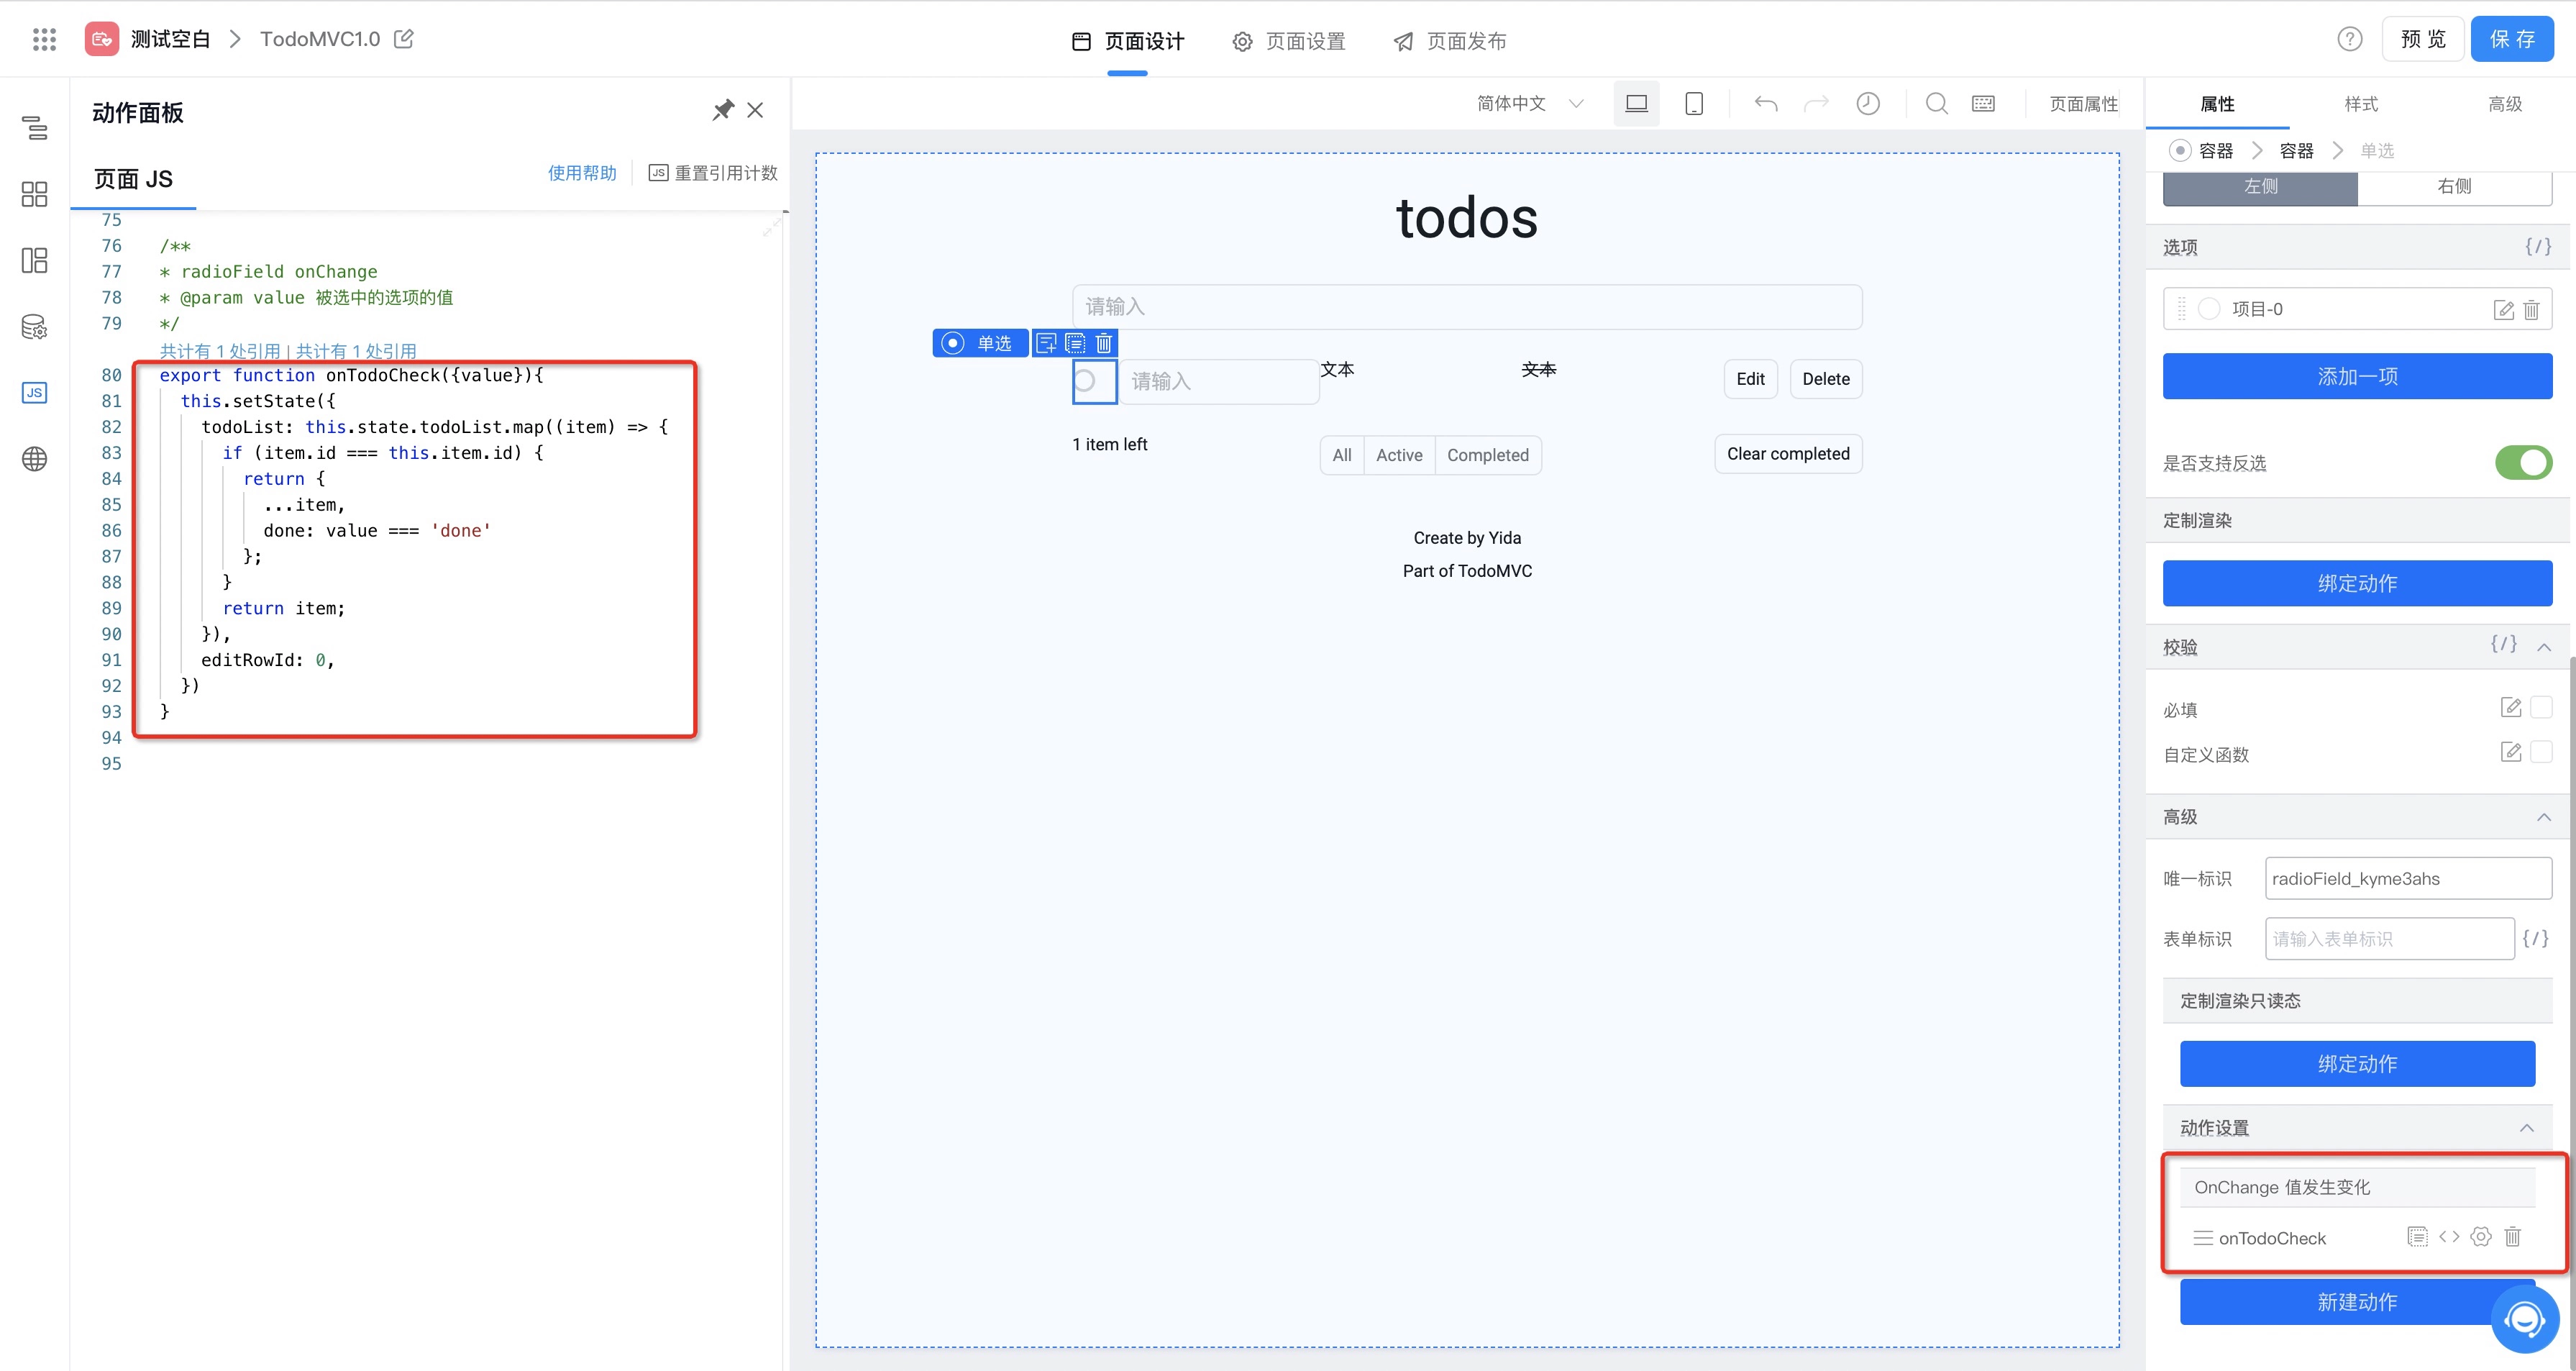
The code for onTodoCheck is as follows:
export function onTodoCheck({ value }) {
  this.setState({
    todoList: this.state.todoList.map((item) => {
      if (item.id === this.item.id) {
        // Find the currently edited task from todoList and update its status
        return {
          ...item,
          done: value === 'done',
        };
      }
      return item;
    }),
    editRowId: 0,
  });
}
Implement Task Delete
When users click the Delete button in the task operation item, they need to be able to delete the task from the task list. This step is relatively simple, we only need to bind the onClicks event ("onDelete") of the Delete button to remove the task from todoList:

onDelete code is as follows:
export function onDelete() {
  this.setState({
    todoList: this.state.todoList.filter((item) => {
      // Remove current task from todoList
      return item.id !== this.item.id;
    }),
  });
}
Step 5: Implement Pending Task Statistics Display
In the todoMVC page, there is a statistical information in the lower left corner used to count the number of pending tasks in the current task list. This function is relatively simple, we only need to bind a variable to the text component that calculates and displays the number of items in todoList with done status as false during each rendering, as follows:

getleftCount code is as follows:
export function getleftCount() {
  const { todoList } = this.state;
  return todoList.filter((item) => !item.done).length;
}
Step 6: Implement Pending Task Filter by Status
In this step, we want to implement the status filter function for the task list. When users click the status filter at the bottom, different status task lists are filtered. We need to implement this function in 2 steps:
- Listen to the onChange event ("onModeChange") of the radio component. When users click to change the filter, update the value of global variable mode:

onModeChange code is as follows:
export function onModeChange({ value }) {
  this.setState({
    mode: value,
  });
}
- Do you remember the loop data we bound to the task list in Step 3? In this step we need to rebind the loop data of the task list, changing the previous
state.todoListtogetShowList()to return a task list that meets the conditions based on the current filter value:

getShowList code is as follows:
export function getShowList() {
  const { mode, todoList = [] } = this.state;
  if (mode === 'Active') {
    // If filter is Active, return all pending task list
    return todoList.filter((item) => !item.done);
  } else if (mode === 'Completed') {
    // If filter is Completed, return all completed task list
    return todoList.filter((item) => item.done);
  }
  return todoList; // Default returns all task list
}
Step 7: Implement Clear Completed Status Pending Tasks
This step is relatively simple. It is actually a batch operation of deleting tasks in Step 4. When users click the Clear Completed button, completed status tasks in the task list are cleared. We only need to listen to the onClick event ("onClearCompleted") of the Clear Completed button, and when users click the button, clear all completed tasks in todoList:
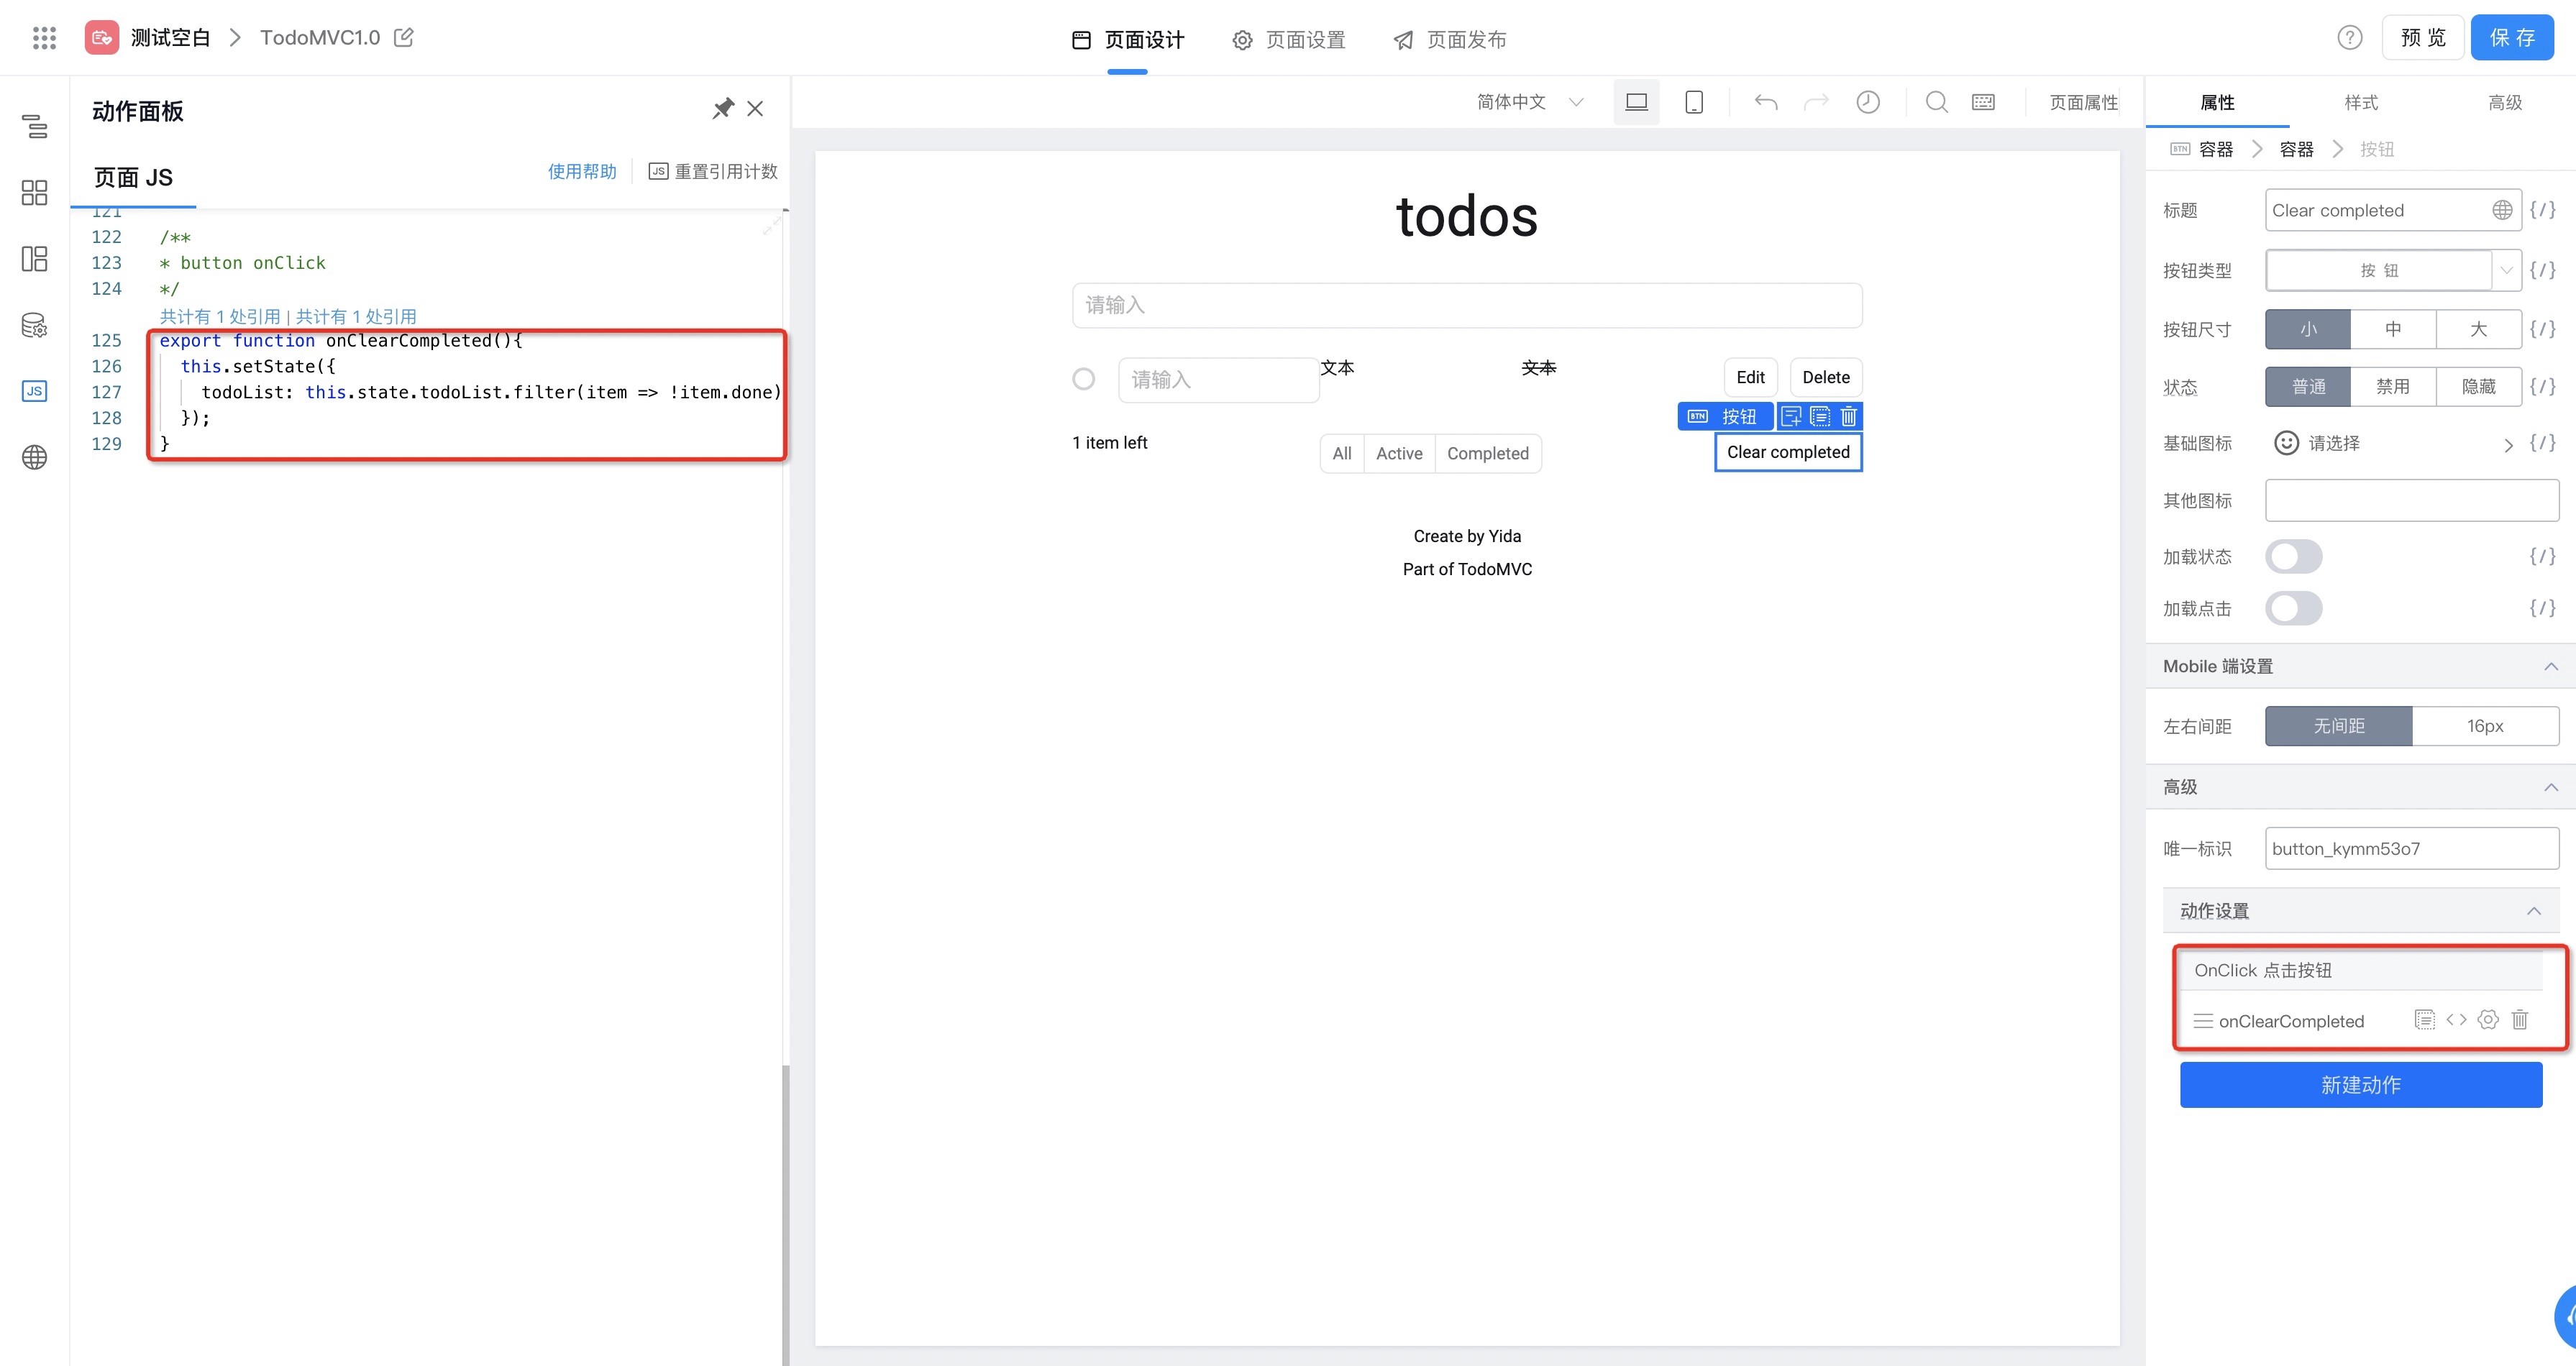
onClearCompleted code is as follows:
export function onClearCompleted() {
  this.setState({
    todoList: this.state.todoList.filter((item) => !item.done), // Filter and remove all uncompleted tasks
  });
}
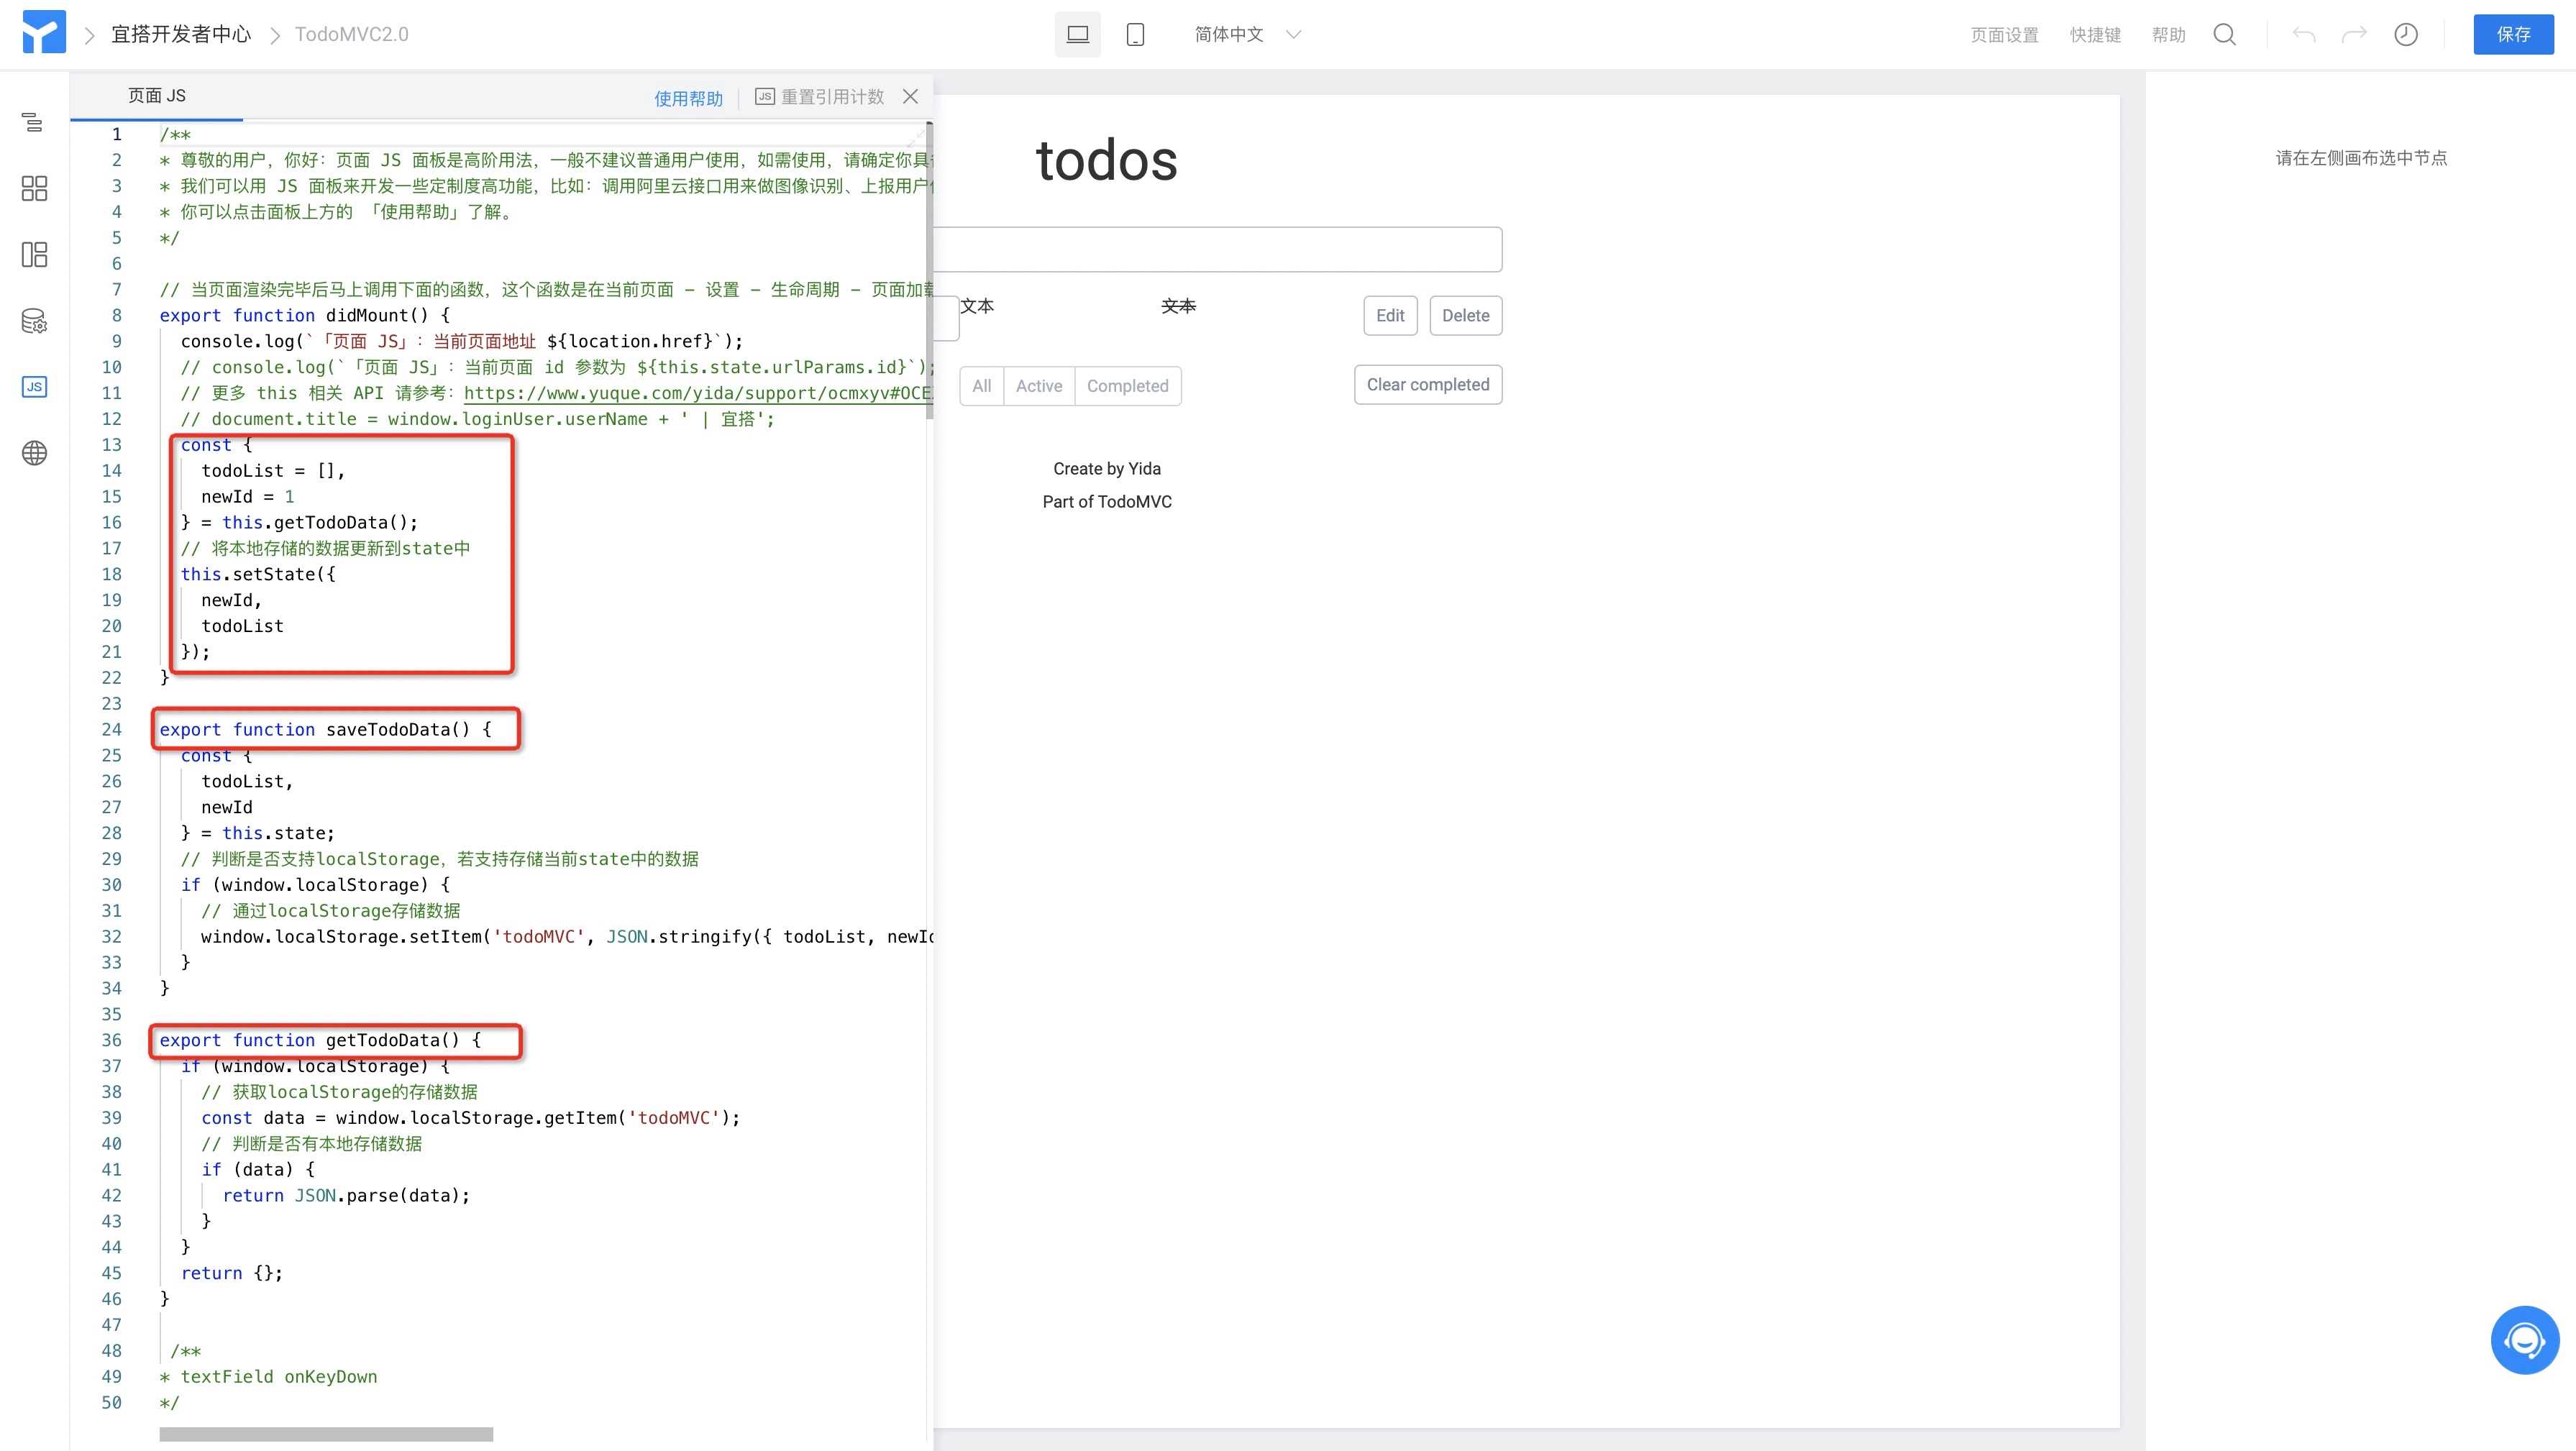
Step 8: Implement Local Storage
Through the above implementation, we basically implemented the core functions of todoMVC. However, our data is currently stored in state, and it is cleared every time the page refreshes. Therefore, we need to find a place to store the user's todoList so it can be displayed when entering next time. We choose to use localStorage for local storage, so we implemented the following two methods:
- saveTodoData - Store todoList and newId in state to localStorage;
export function saveTodoData() {
  const { todoList, newId } = this.state;
  // Check if localStorage is supported, if supported store current data in state
  if (window.localStorage) {
    // Store data through localStorage
    window.localStorage.setItem('todoMVC', JSON.stringify({ todoList, newId }));
  }
}
- getTodoData - Get data from localeStorage;
export function getTodoData() {
  if (window.localStorage) {
    // Get stored data from localStorage
    const data = window.localStorage.getItem('todoMVC');
    // Check if there is local stored data
    if (data) {
      return JSON.parse(data);
    }
  }
  return {};
}
With the above two basic methods, we next only need to do two things:
- Call the getTodoData API in didMount lifecycle to get local data and update the state in state;
- Add
this.saveTodoData()call below allsetStatestatements that modify todoList above;
Specifically as follows:

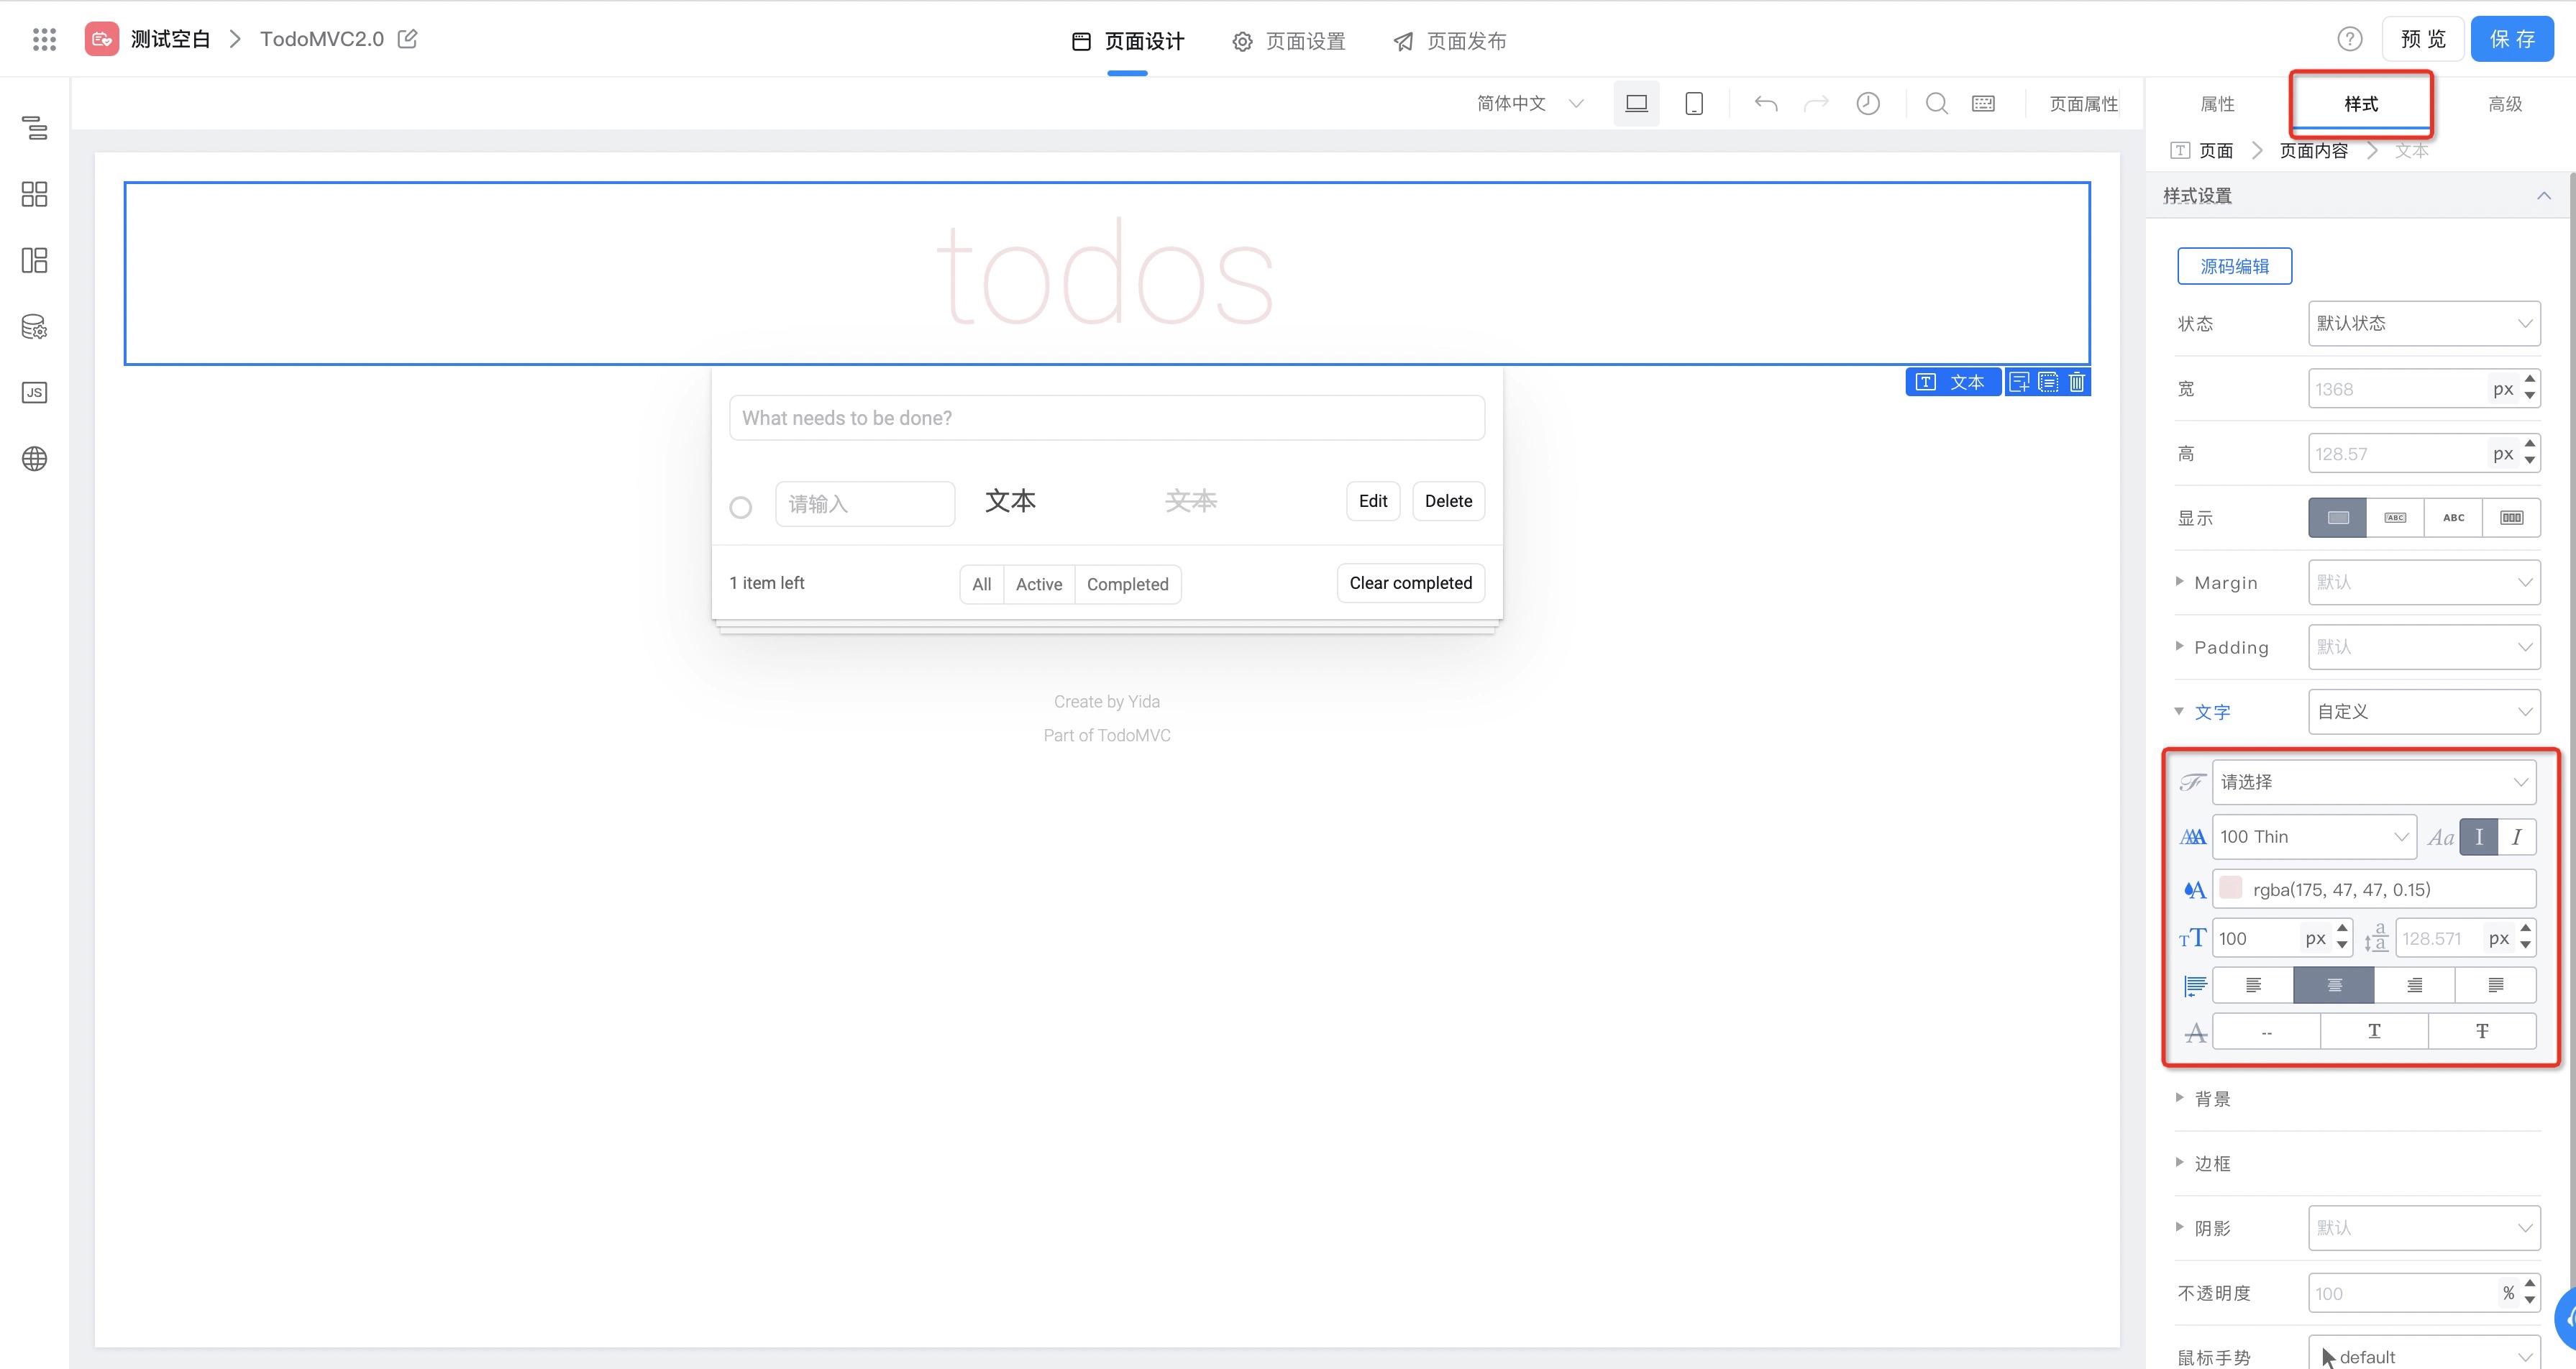
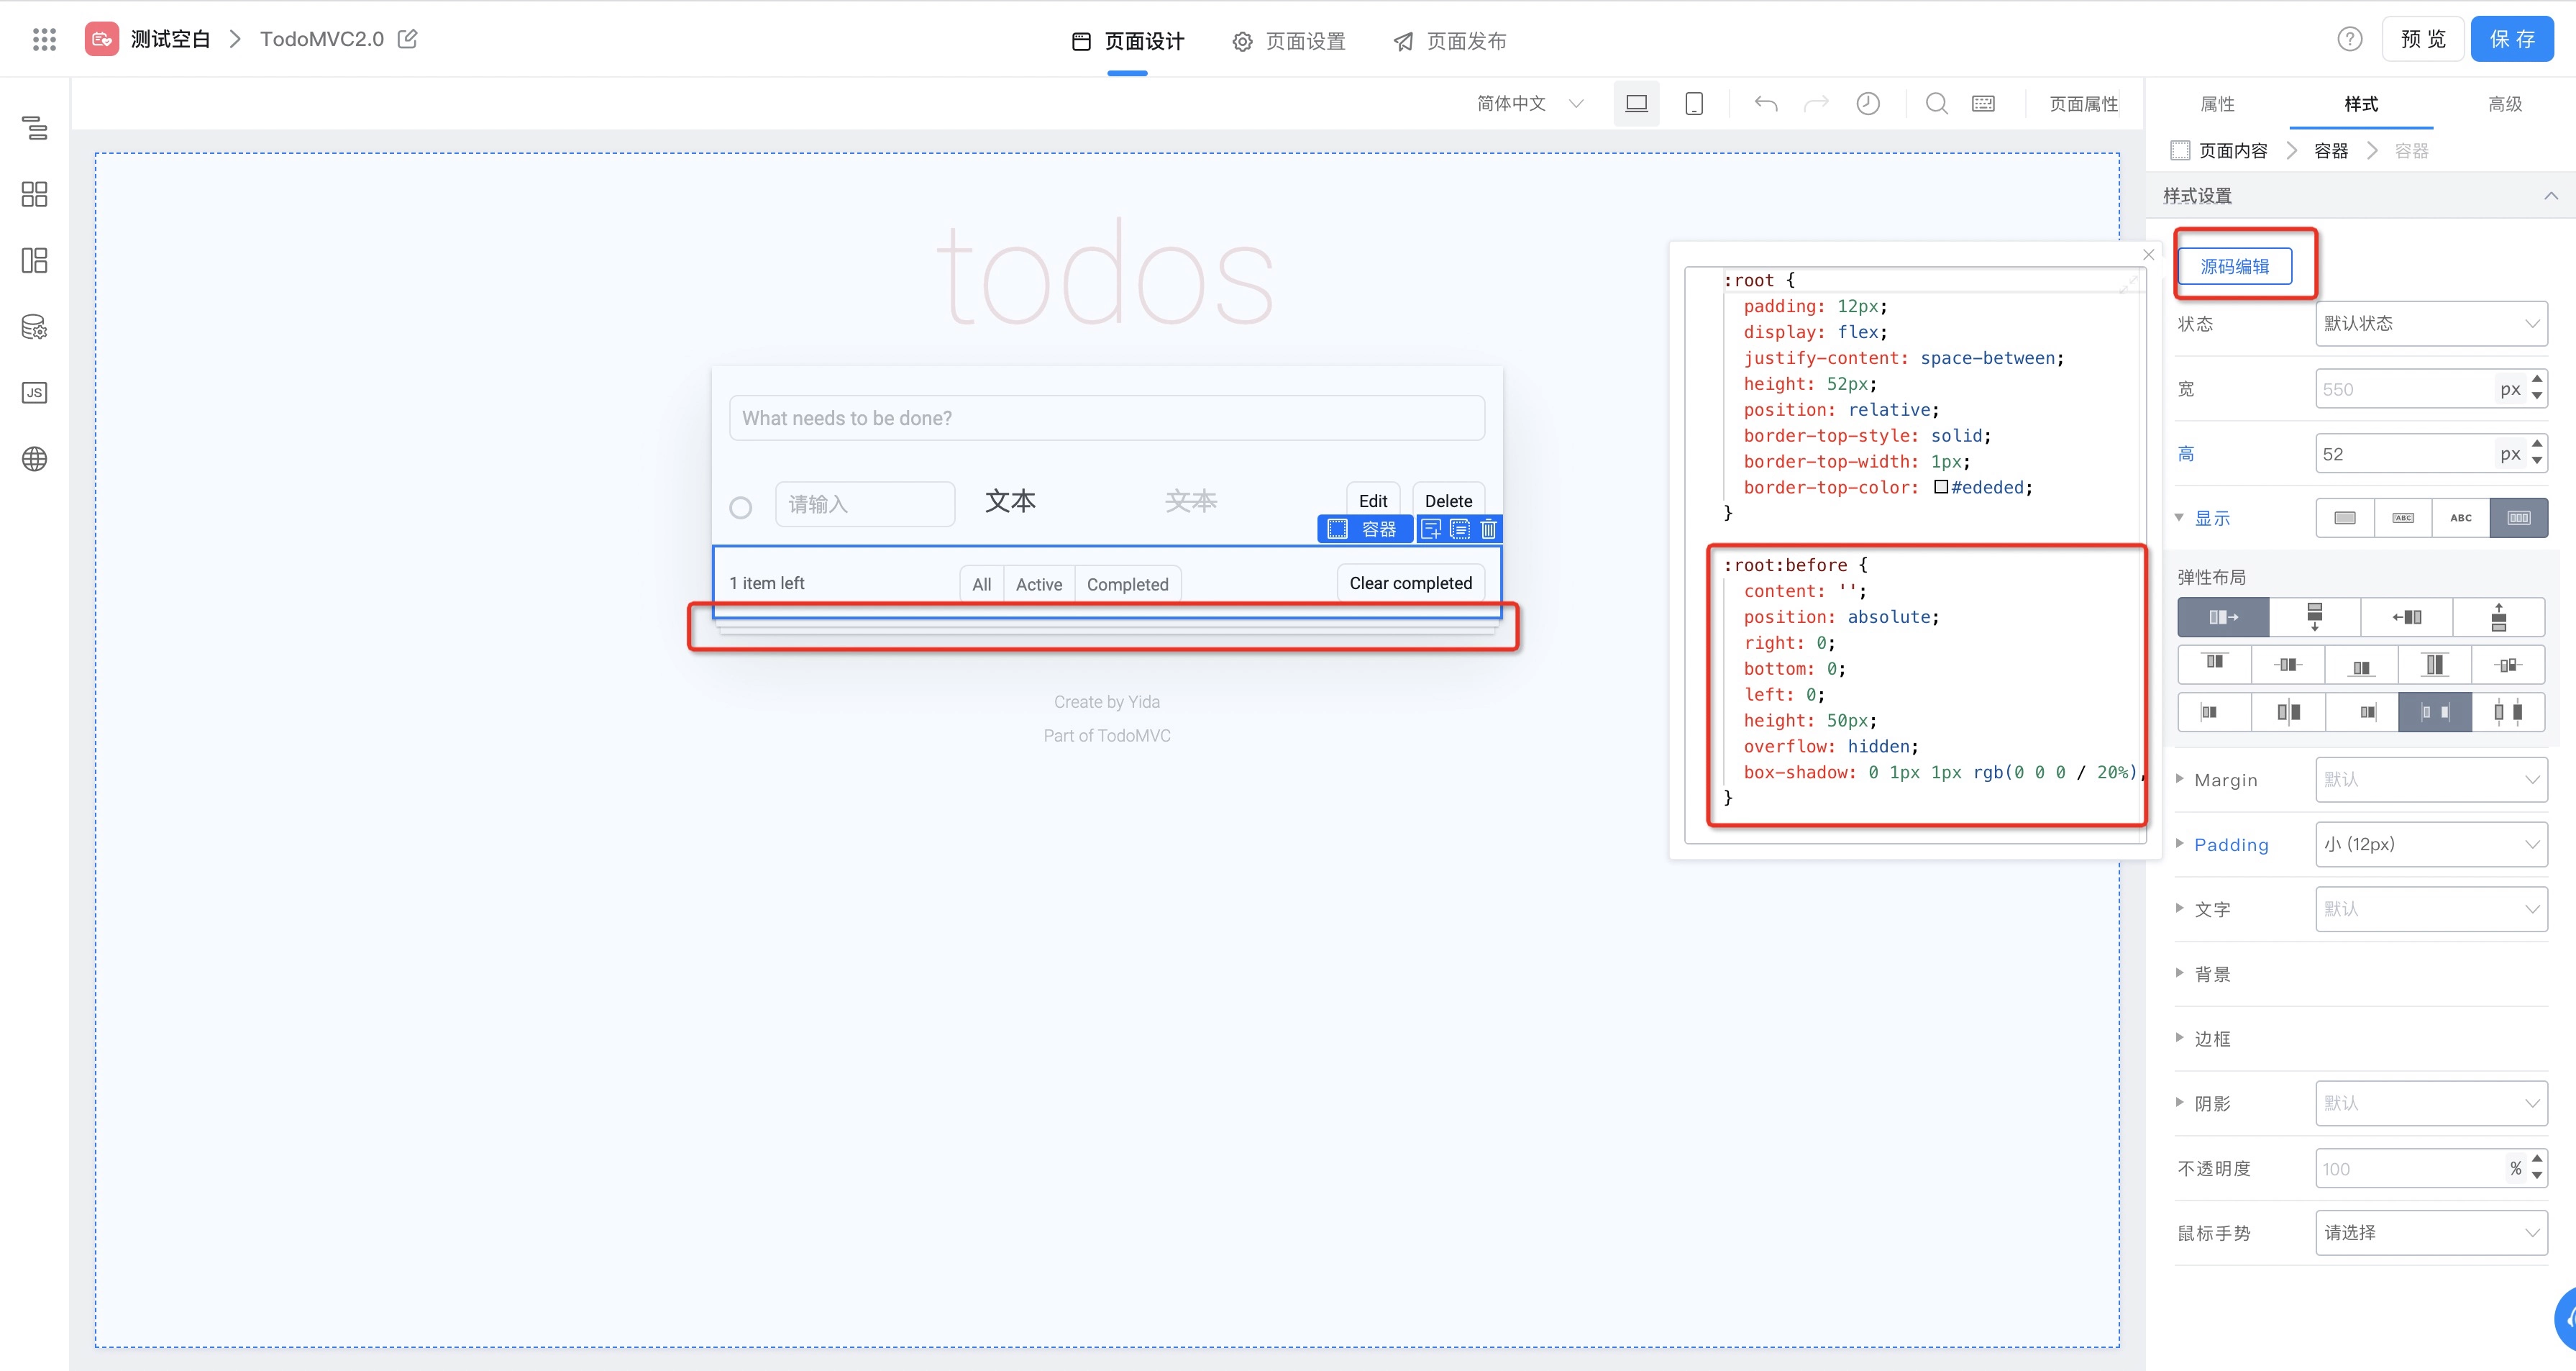
Style Improvement - Giving TodoMVC a Good Looking Appearance
In the previous step, we completed the basic function implementation of TodoMVC, but the first impression is that it looks ugly. For a product, a good looking appearance is not the most important, but if it doesn't have a good looking appearance, it's definitely not a good product. Yida provides custom style capabilities, see Style Customization Document for details. Through customizing styles, we will get the following effect (users can also visit Example Page to try it out, and view specific implementation through Designer):
This section does not detail every style customization detail, only listing some representative style customization cases:
-
Customize component style through style panel - For example, the large logo of TodoList, we can implement by configuring font style in the style panel, as follows:
-
Customize component style through CSS - The style panel coverage is limited after all. Yida provides the ability to customize component styles by writing CSS. For example, the layered effect below the panel is implemented through the before pseudo-class:
Data Source Connection - Giving TodoMVC Powerful Equipment
Up to the previous step, the basic capabilities of the official TodoMVC have been implemented. However, careful developers will find that the current product status functionality is available, but if you visit with a different browser, the pending task data will be lost. This is not a deployable TodoList function. Besides providing basic UI and front-end logic customization capabilities, Yida also provides powerful data capabilities. Now let's equip TodoMVC with powerful equipment and implement persistent data storage. The final effect is as follows:
Since calling Yida's OpenAPI requires authentication, the page cannot be set as a login-free page for everyone to try. However, developers can go to Designer to view the specific implementation of the page.
Step 1: Create Regular Form, Build Task Data Storage Structure
First, we create a regular form in the current application to store pending task information. For the specific solution to create regular forms, see Yida Usage Document, which will not be described in detail here, as follows:

After the form is created, we will get a FormUuid, which is the unique identifier of this form, as shown in the red box in the above figure.
Step 2: Use Remote API to Implement Task CRUD
Having a place to store task data, we need to create asynchronous APIs in TodoMVC for task CRUD. Yida designer provides remote API configuration for requesting remote http interfaces (see Remote API Document for details), and Yida also provides commonly used OpenAPI interfaces to implement basic data operations (see OpenAPI Document for details). We create the following remote API configurations in the page builder:
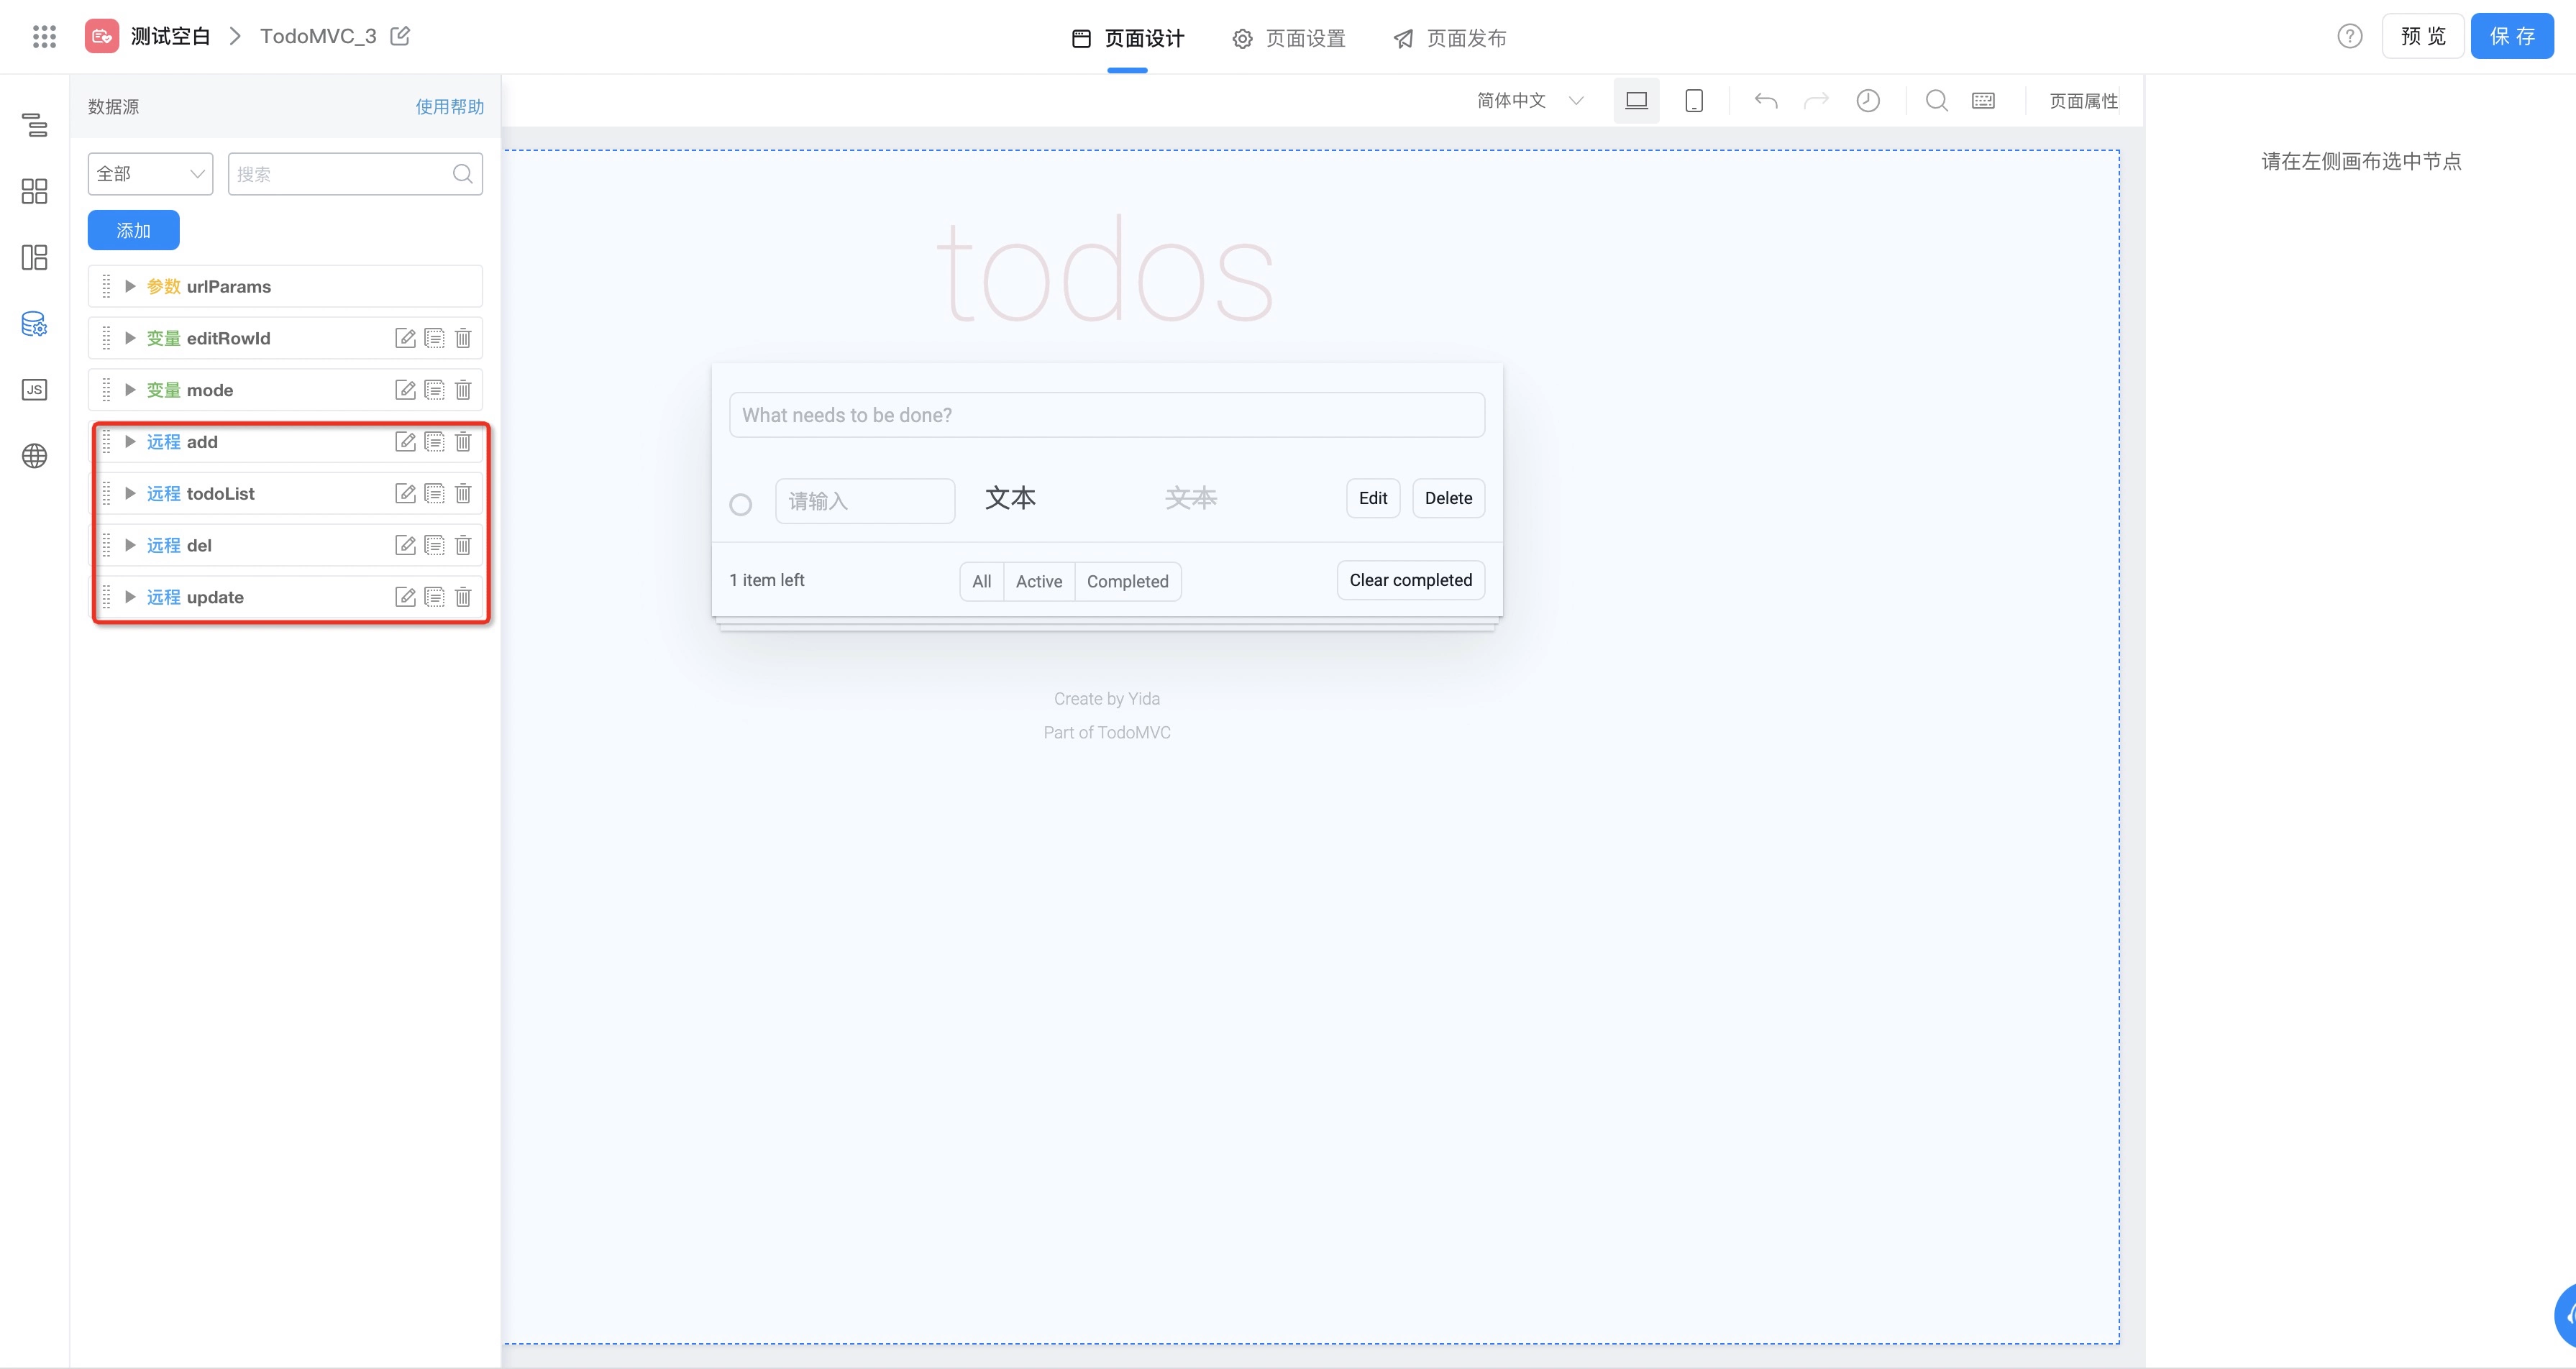
todoList
Get task list data, specific configuration as follows:
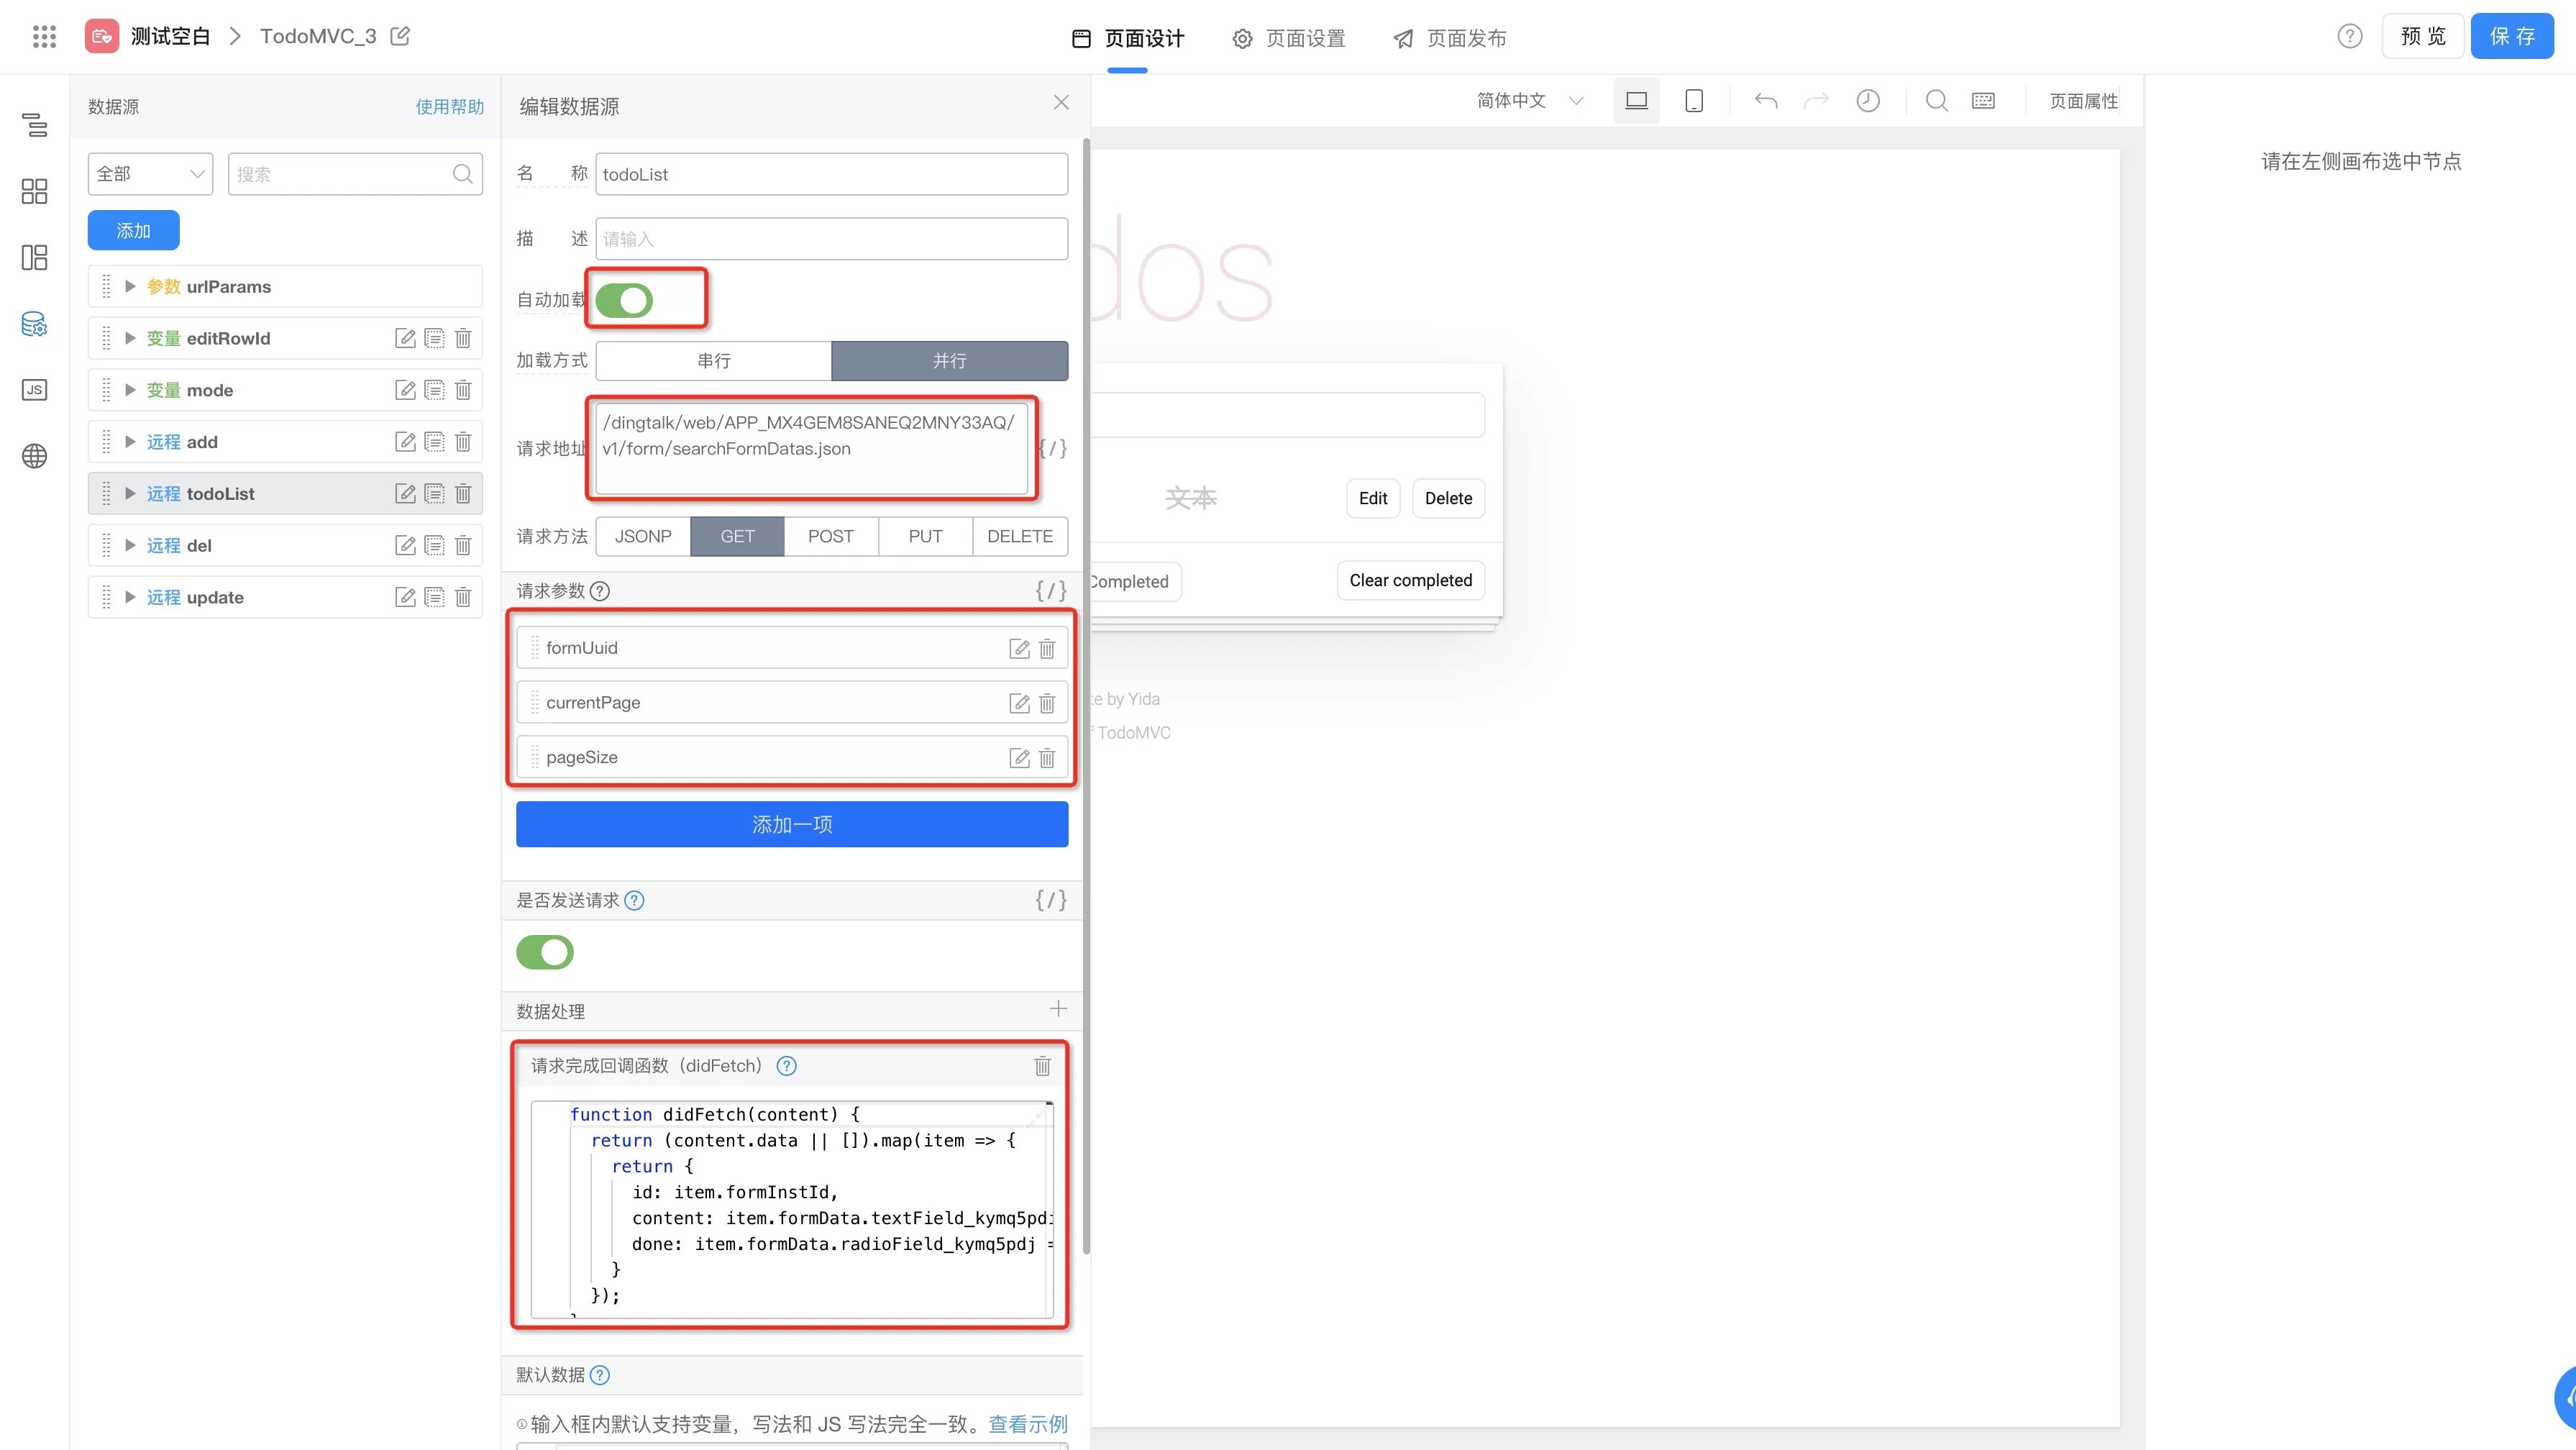
- Turn on the auto-load switch, i.e., automatically load the interface when entering the page. Yida will automatically mount the interface return content to
state.todoList; - Configure request link and request method according to OpenAPI document format;
- Configure request parameters
- formUuid- The unique identifier of the form we use to store task information, i.e., the formUuid of the form created in the previous step;
- currentPage- Current page number. Yida's open interface supports pagination. Since we mainly do sample display here, we won't do pagination processing, fix the parameter to 1 to get the first page data;
- pageSize- Number per page. Yida open interface defaults to 10 per page. For better demonstration experience, we fix the parameter to 50 to get nearly 50 pieces of data;
- Configure didFetch processing function, convert the structure of the open interface to the data structure that can be recognized in the logical implementation part above, specific implementation as follows:
function didFetch(content) {
  return (content.data || []).map((item) => {
    return {
      id: item.formInstId, // Form data instance ID, i.e., the unique identifier of each row of data
      content: item.formData.textField_kymq5pdi, // Task content information, textField_kymq5pdi is the unique identifier of the task content control in the task form
      done: item.formData.radioField_kymq5pdj === 'Completed', // Task status, newly created tasks default to incomplete status, radioField_kymq5pdj is the unique identifier of the task status control in the task form
    };
  });
}
add
Used to create pending tasks, specific configuration as follows:

- Configure request link and request method according to OpenAPI document format;
- Configure request parameters
- formUuid- Same as above;
- appType- Current application ID (starting with APP_ and can be obtained from the current page URL);
- Configure willFetch processing function. We need to convert task information to a format recognizable by Yida according to the OpenAPI parameter format, specific implementation as follows:
function willFetch(vars, config) {
  const { content } = vars.data; // Get content information of new task
  vars.data.formDataJson = JSON.stringify({
    // Creating form instances needs to process parameters with stringify and put them in formDataJson field
    textField_kymq5pdi: content, // Task content information, textField_kymq5pdi is the unique identifier of the task content control in the task form
    radioField_kymq5pdj: 'Incomplete', // Task status, newly created tasks default to incomplete status, radioField_kymq5pdj is the unique identifier of the task status control in the task form
  });
}
- Configure didFetch processing function. Pop up notification of successful operation after create interface request success and refresh task list, specific implementation as follows:
function didFetch(content) {
  this.utils.toast({
    // Notify operation success
    title: 'Add Success!',
  });
  this.reloadDataSource(); // Re-request initial request (i.e., todoList interface), refresh task list
  return content; // Important, need to return content
}
del
Used to delete pending tasks, relatively simple, specific configuration as follows:

But there are two things to note:
- The ID of the task to be deleted is not fixed, so when calling
dataSourceMap.del.loadAPI, the specific ID of the task to be deleted needs to be passed; - There is no didFetch for deleting tasks because in implementing Clear Completed, multiple calls to this asynchronous API in batch are needed, so the didFetch logic needs to be implemented in the then method of manually calling asynchronous requests;
update
Used to update pending tasks, specific configuration as follows:

- Configure request link and request method according to OpenAPI document format;
- Configure willFetch processing function, same as add configuration. We need to convert task content to data structure recognizable by Yida, specific implementation as follows:
function willFetch(vars, config) {
  const { id, content, done } = vars.data;
  vars.data.formInstId = id; // Task ID, the unique identifier of the task
  const data = {};
  if (content) {
    // If content information needs to be modified, then concatenate this parameter
    data.textField_kymq5pdi = content;
  }
  if (typeof done === 'boolean') {
    // If status information is modified, then concatenate this parameter
    data.radioField_kymq5pdj = done ? 'Completed' : 'Incomplete';
  }
  vars.data.updateFormDataJson = JSON.stringify(data);
}
- Configure didFetch processing function, logic similar to add, success notification + refresh list, specific implementation as follows:
function didFetch(content) {
  this.utils.toast({
    title: 'Update Success!',
  });
  this.reloadDataSource();
  return content; // Important, need to return content
}
While adding remote API configurations, we deleted several previously set global variables:
- todoList- Because the list is now obtained through remote API, there is no need to store totoList information in state;
- newId- Because every time a pending task is created, Yida automatically generates a unique formInstId, so there is no need for task ID generation;
Step 3: Replace Original Data Management Logic with Remote API Calls
After completing the remote API settings in the previous step, we only need to modify some of the previous logical implementation part, replacing the logic of operating global variables with remote API calls. The specific changes are as follows:
- Modify onRowAdd implementation, call add remote API for task creation, specific implementation as follows:
export function onRowAdd(e) {
  // Only handle Enter key
  if (e.keyCode !== 13) return;
  this.dataSourceMap.add.load({
    // Call remote API
    content: this.$('input').getValue(),
  });
}
- Modify onDelete implementation, call del remote API for task deletion, specific implementation as follows:
export function onDelete() {
  this.dataSourceMap.del
    .load({
      // Call remote API
      formInstId: this.item.id, // Pass in dynamic parameter
    })
    .then((res) => {
      // Remote API callback processing, similar to didFetch in configuration
      this.utils.toast({
        // Success notification
        title: 'Delete Success!',
      });
      this.reloadDataSource(); // Refresh task list
    });
}
- Modify onRuleEdit implementation, call update remote API to update task content, specific implementation as follows:
export function onRowEdit(e) {
  // Only handle Enter key
  if (e.keyCode !== 13) return;

  this.dataSourceMap.update.load({
    id: this.item.id,
    content: this.$('rowInput').getValue(),
  });
  this.setState({
    editRowId: 0,
  });
}
- Modify onTodoCheck implementation, call update remote API to update task status, specific implementation as follows:
export function onTodoCheck({ value }) {
  this.dataSourceMap.update.load({
    id: this.item.id,
    done: value === 'done',
  });
  this.setState({
    editRowId: 0,
  });
}
- Modify onClearCompleted implementation, batch call del remote API to clear completed tasks, specific implementation as follows:
export function onClearCompleted() {
  const deleteItems = this.state.todoList.filter((item) => item.done); // Filter list of tasks to be deleted
  Promise.all(
    deleteItems.map((item) =>
      this.dataSourceMap.del.load({
        // Batch call del remote interface for task deletion through Promise.all
        formInstId: item.id,
      })
    )
  ).then((res) => {
    // Promise.all callback processing
    this.utils.toast({
      // Success notification
      title: 'Clear Success!',
    });
    this.reloadDataSource(); // Refresh task list
  });
}
Online Try
Example Experience Center|TodoMVC
Conclusion
This tutorial guides developers step by step from 0 to complete the construction of a TodoMVC custom page. The construction process involves almost all commonly used knowledge of Yida custom pages. It is hoped that this example will enhance your Yida usage skills to implement more complex business support scenarios. Feel free to provide timely feedback for any issues.